The ImageList is a simple control that stores images used by other controls at runtime. For example, a TreeView control can use icons to identify its nodes. The simplest and quickest method of preparing these images is to create an ImageList control and add to it all the icons you need for decorating the TreeView control’s nodes. The ImageList control maintains a series of bitmaps in memory that the TreeView control can access quickly at runtime. Keep in mind that the ImageList control can’t be used on its own and remains invisible at runtime.
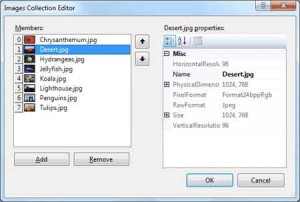
To use the ImageList control in a project, double-click its icon in the Toolbox (you’ll find it in the Components tab) to place an instance of the control on your form. To load images to an ImageList control, locate the Images property in the Properties window and click the ellipsis button next to the property name. Alternatively, you can select the Choose Images command of the control’s context menu. The Images Collection Editor dialog box (see Figure 4.24) will pop up, and you can load all the images you want by selecting the appropriate files. All the images should have the same dimensions — but this is not a requirement. Notice that the ImageList control doesn’t resize the images; you must make sure that they have the proper sizes before loading them into the control.
To add an image to the collection, click the Add button. You’ll be prompted to select an image file through the Open File dialog box. Each image you select is added to the list. When you select an image in this list, the properties of the image are displayed in the same dialog box — but you can’t change these properties, except for the image’s name, which is the file’s name by default. Add a few images and then close the Images Collection Editor. In the control’s Properties window, you can set the size of all images and the TransparentColor property, which is a color that will be treated as transparent for all images (this color is also known as the key color). The images will be resized accordingly by the control as they’re displayed.

Figure 4.24 – The Images Collection Editor of ImageList Control
The other method of adding images to an ImageList control is to call the Add method of the Images collection, which contains all the images stored in the control. To add an image at runtime, you must first create an Image object with the image (or icon) you want to add to the control and then call the Add method as follows:
ImageList1.Images.Add(image)Code language: VB.NET (vbnet)where image is an Image object with the desired image. You will usually call this method as follows:
ImageList1.Images.Add(Image.FromFile(path))Code language: VB.NET (vbnet)where path is the full path of the file with the image.
The Images collection of the ImageList control is a collection of Image objects, not the files in which the pictures are stored. This means that the image files need not reside on the computer on which the application will be executed, as long as they have been added to the collection at design time.


