To start new project in Visual Basic 2008, you can create a new project and start working with Visual Studio. To best explain the various items of the IDE, we will build a simple form. The form is the window of your application — it’s what users will see on their Desktop when they run your application.
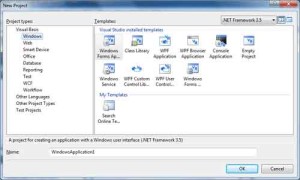
Open the File menu and choose New Project, or click Create Project/Solution in the Start Page. In the New Project dialog box that pops up (see Figure 1.2), you’ll see a list of project types you can create with Visual Studio. The most important ones are Windows Forms Applications, which are typical Windows applications with one or more forms (windows); Console Applications, which are simple applications that interact with the user through a text window (the console); Windows Forms Control Libraries, which are collections of custom controls; and Class Libraries, which are collections of classes. These are the project types we’ll cover in-depth in this tutorial.
Notice the Create Directory For Solution check box in the dialog box of Figure 1.2. By default, Visual Studio creates a new folder for the project under the folder you have specified in the Location box. If you want to put together a short application to test a feature of the language, or perform some trivial task, you may not wish to save the project. In this case, just clear the check box to skip the creation of a new project folder.

Figure 1.2 – New Project Dialog box
You can always save a project at any time by choosing the Save All command from the File menu. You’ll be prompted at that point about the project’s folder, and Visual Studio will save the project under the folder you specified. If you decide to discard the project, you can create a new project or close Visual Studio. Visual Studio will prompt you about an open project that hasn’t been saved yet, and you can choose not to save it.
You may discover at some point that you have created too many projects, which you don’t really need. You can remove these projects from your system by deleting the corresponding folders — no special action is required. You’ll know it’s time to remove the unneeded project folder when Visual Studio suggests project names such as WindowsApplication12 or WindowsApplication35.
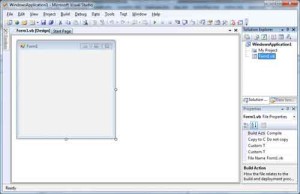
For our project, select the Windows Forms Application template; Visual Studio suggests the name WindowsApplication1 as the project name. Change it to any name which is meaningful so you can identify the project with its name itself. For our project change the name into MyTestApplication, select the Create Directory For Solution check box, and then click the OK button to create the new project. What you see now is the Visual Studio IDE displaying the Form Designer for a new project, as shown in Figure 1.3. The main window of your copy of Visual Studio may be slightly different, but don’t worry about it. I’ll go through all the components you need to access in the process of designing, coding, and testing a Windows application.

Figure 1.3 – Form Designer for New Project
The new project contains a form already: the Form1 component in the Solution Explorer. The main window of the IDE is the Form Designer, and the gray surface on it is the window of your new application in design mode. Using the Form Designer, you’ll be able to design the visible interface of the application (place various components of the Windows interface on the form and set their properties) and then program the application.
The default environment is rather crowded, so let’s hide a few of the toolbars that we won’t use in the projects of the first few chapters. You can always show any of the toolbars at any time. Open the View menu and choose Toolbars. You’ll see a submenu with 28 commands that are toggles. Each command corresponds to a toolbar, and you can turn the corresponding toolbar on or off by clicking one of the commands in the Toolbars submenu. For now, turn off all the toolbars except for the Layout and Standard toolbars. These are the toolbars shown by default and you shouldn’t hide them; if you do, this is the place to make them visible again.
The last item in the Toolbars submenu is the Customize command, which leads to a dialog box in which you can specify which of the toolbars and which of the commands you want to see. After you have established a work pattern, use this menu to customize the environment for the way you want to work with Visual Studio. You can hide just about any component of the IDE, except for the main menu — after all, you have to be able to undo the changes!


