

SQL Server Management Studio gives you a complete authoring environment for all types of queries. You can create, save, load, and edit queries. SQL Server Management Studio allows you to work on queries without being connected to a particular server. This tool also gives you the option of developing your queries with different projects.
The authoring capabilities are associated with Query Editor as well as Solution Explorer, both of which are described in this section. Besides these two components of SQL Server Management Studio we will describe how you can debug SQL code using the existing debugger.
Query Editor
To launch the Query Editor pane, click the New Query button in the toolbar of SQL Server Management Studio. If you expand it to show all the possible queries, it shows more than just a Database Engine query. By default, you get a new Database Engine query, but other queries are possible, such as MDX queries, XMLA queries, and other queries.
Once you open Query Editor, the status bar at the bottom of the pane tells you whether your query is in a connected or disconnected state. If you are not connected automatically to the server, the Connect to SQL Server dialog box appears, where you can type the name of the database server to which you want to connect and select the authentication mode.
Query Editor can be used by end users for the following tasks:
- Generating and executing Transact-SQL statements
- Storing the generated Transact-SQL statements in a file
- Generating and analyzing execution plans for generated queries
- Graphically illustrating the execution plan for a selected query
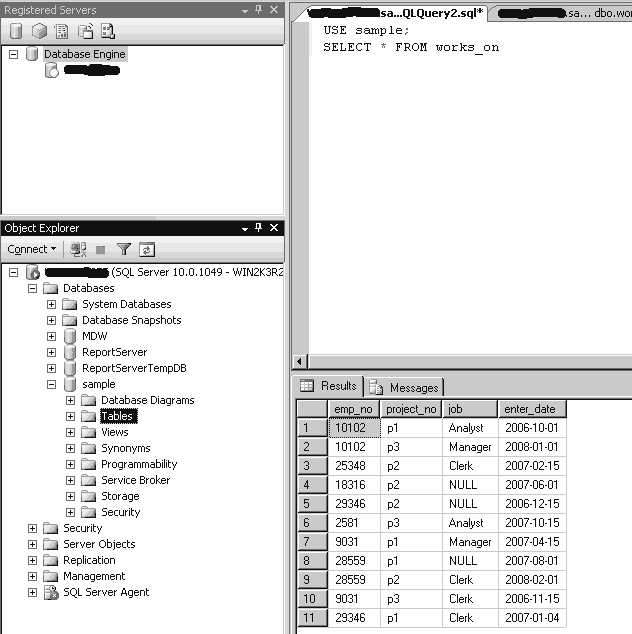
Query Editor contains an internal text editor and a selection of buttons in its toolbar. The main window is divided into a query pane (upper) and a results pane (lower). Users enter the Transact-SQL statements (queries) that they want to execute into the query pane, and after the system has processed the queries, the output is displayed in the results pane.
The example shown in Figure 3-11 demonstrates a query entered into Query Editor and the output returned. The first statement in the query pane, USE, specifies the sample database as the current database. The second statement, SELECT, retrieves all the rows of the works_on table. Clicking the Query button in the Query Editor toolbar and then selecting Execute or pressing f5 returns the results of these statements in the results pane of Query Editor.
The following additional information concerning the execution of the statement(s) is displayed in the status bar at the bottom of the Query Editor window:
- The status of the current operation (for example, “Query executed successfully”)
- Database server name
- Current username and server process ID
- Current database name
- Elapsed time for the execution of the last query
- The number of retrieved rows
One of the main features of SQL Server Management Studio is that it’s easy to use, and that also applies to the Query Editor component. Query Editor supports a lot of features that make coding of Transact-SQL statements easier. First, Query Editor uses syntax highlighting to improve the readability of Transact-SQL statements. It displays all reserved words in blue, all variables in black, strings in red, and comments in green. (For a discussion of reserved words, see the next chapter.)
There is also the context-sensitive help function called Dynamic Help that enables you to get help on a particular statement. If you do not know the syntax of a statement, just highlight that statement in the editor and select Help | Dynamic Help. You can also highlight options of different Transact-SQL statements to get the corresponding text from Books Online.
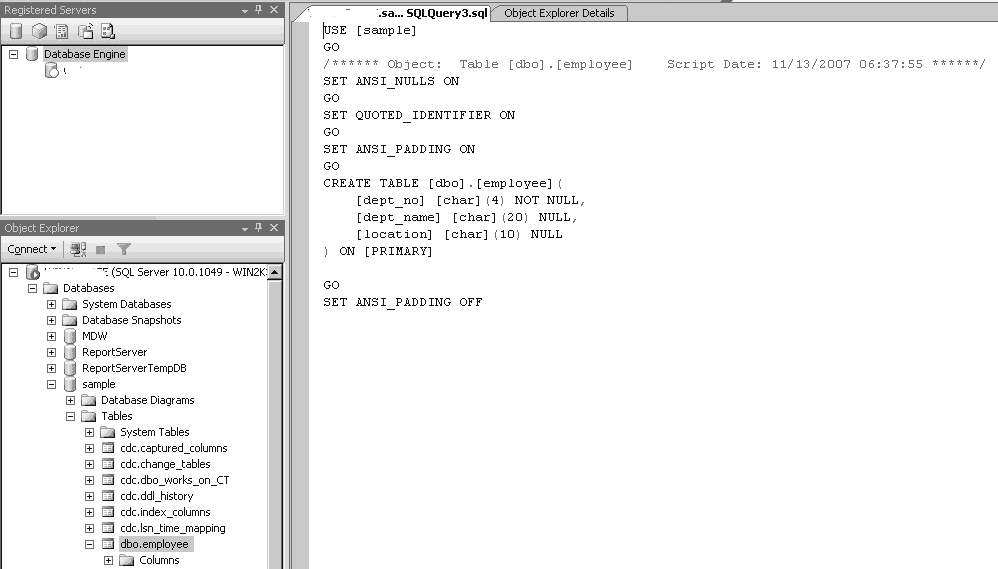
Object Explorer can also help you edit queries. For instance, if you want to see the corresponding CREATE TABLE statement for the employee table, drill down to this database object, right-click the table name, select Script Table As, and choose CREATE to New Query Editor Window. Figure 3-12 shows the Query Editor window with the CREATE TABLE statement. (This capability extends also to other objects, such as stored procedures and functions.)
Object Explorer is very useful if you want to display the graphical execution plan for a particular query. (The execution plan is the plan selected by the optimizer to execute a given query.) If you select Query | Display Estimated Execution Plan, the system will display the graphical plan instead of the result set for the given query.
Solution Explorer
Query editing in SQL Server Management Studio is solution-based. If you start a blank query using the New Query button, it will still be based on a blank solution. You can see this by choosing View | Solution Explorer right after you open your blank query.
A solution can have zero, one, or more projects associated with it. A blank solution does not contain any project. If you want to associate a project with the solution, close your blank solution, Solution Explorer, and the Query Editor window, and start a new project by choosing File | New | Project. In the New Project window, choose SQL Server Scripts. A project is a method of organizing files in a selected location. You can choose a name for the project and select its location on disk. When you create a new project, by default you start a new solution. You can add a project to an existing solution using Solution Explorer.
Once the new project and solution are created, Solution Explorer shows nodes in each project for Connections, Queries, and Miscellaneous. To open a new Query Editor window, right-click the Queries node and choose New Query.
SQL Server Debugging
Since SQL Server 2008, you can debug SQL code using the existing debugger. To start debugging, choose Debug | Start Debugging in the main menu of SQL Server Management Studio. A batch from a later chapter will be used here to demonstrate how the debugger works. (A batch is a sequence of SQL statements and procedural extensions that comprises a logical unit and is sent to the Database Engine for execution of all statements included in the batch.) Figure 3-13 shows a batch that counts the number of employees working for the p1 project. If the number is 4 or more, the corresponding message is displayed. Otherwise, first and last names of the employees will be printed.
You can set the breakpoints shown in Figure 3-13 just by clicking in front of the line where the execution process should stop. At the beginning, the editor shows a yellow arrow to the left of the first line of code. You can move the arrow by choosing Debug | Continue. In that case, all statements up to the first breakpoint are executed, and the yellow arrow moves to that breakpoint.
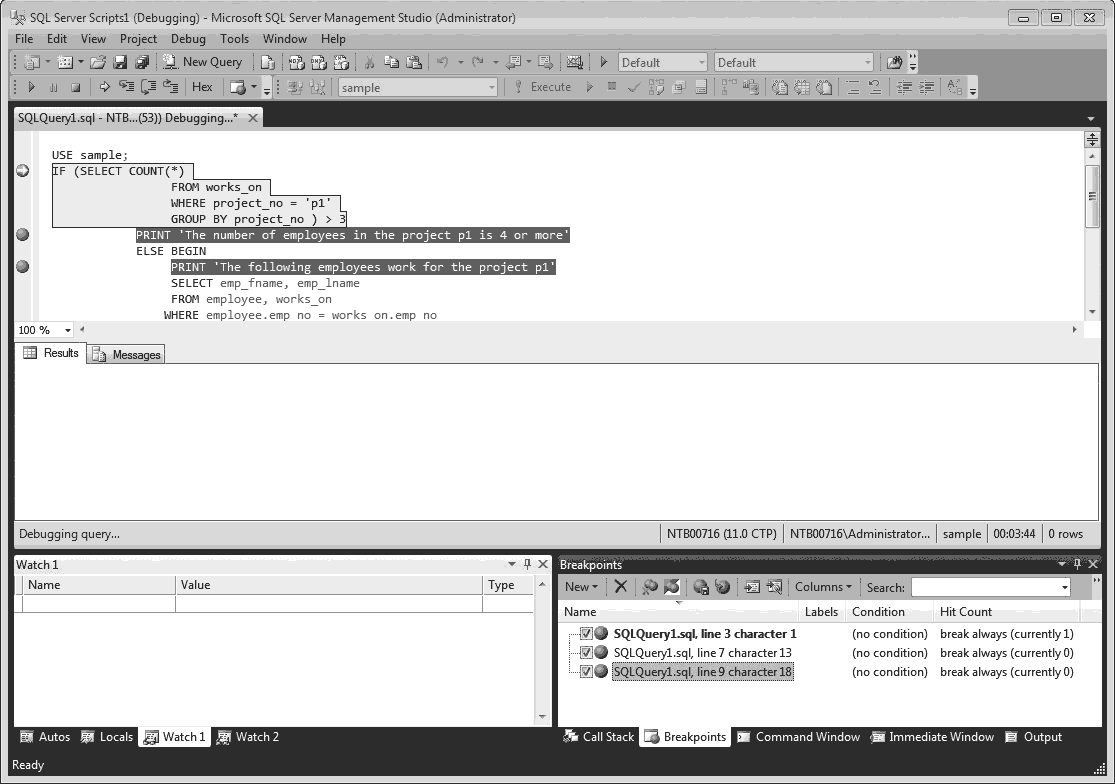
In debugger mode, SQL Server Management Studio opens two panes, which are placed at the bottom of the editor. All the information concerning the debugging process is displayed in these two panes. Both panes have tabs that you can select to control which set of information is displayed in the pane. The left pane contains Autos, Locals and up to four Watch tabs. The right pane contains Call Stack, Threads, Breakpoints, Command Window, Immediate Window, and Output tabs. For instance, you can use the Locals tab to view values of variables, the Call Stack tab to review the call stack, and the Watch tabs to type (or drag) a part of the code of an SQL expression and to evaluate it. (In Figure 3-13, for instance, the Watch1 tab is activated in the left pane, and the Breakpoints tab is activated in the right pane.)
To end the debugging process, select the blue square icon in the debugging toolbar or choose Debug | Stop Debugging.
SQL Server 2012 enhances the functionality of the SQL Server Management Studio Debugger with several new features. You can now do the following:
- Specify a breakpoint condition – A breakpoint condition is an SQL expression whose evaluation determines whether the breakpoint is invoked. To specify a breakpoint condition, right-click the breakpoint glyph and click Condition on the pop-up menu. In the Breakpoint Condition dialog box, enter a Boolean expression and choose either Is True, if you want to break when the expression evaluates to true, or Has Changed, if you want to break, when the value has changed.
- Specify a breakpoint hit count – A hit count is a counter that specifies the number of times a breakpoint is reached. If the specified hit count is reached, and any specified breakpoint condition is satisfied, the debugger performs the action specified for the breakpoint. The action could be any of the following:
- Break always (the default action)
- Break when the hit count equals a specified value
- Break when the hit count equals a multiple of a specified value
- Break when the hit count is greater than or equal to a specified value
To specify a hit count, right-click the breakpoint glyph on the Breakpoint window and click Hit Count on the pop-up menu (see Figure 3-13). In the Breakpoint Hit Count dialog box, select one of the actions from the preceding list. If you need to set the hit count to a value, enter an integer in the text box that appears. Click OK to make the modifications.
- Specify a breakpoint filter – A breakpoint filter limits the breakpoint to operating only on specified computers, processes, or threads. To specify a breakpoint filter, choose Breakpoint | Filter. You can then specify the resource that you want to limit in the Breakpoint Filters dialog box. Click OK to make the modifications.
- Specify a breakpoint action – A breakpoint When Hit action specifies a custom task that is performed when the breakpoint is invoked. The default action for a breakpoint is to break execution when both the hit count and breakpoint condition have been satisfied. The alternative could be to print a specified message. To specify a breakpoint action, right-click the breakpoint glyph and then click When Hit on the pop-up menu. In the When Breakpoint Is Hit dialog box, select the action you want. Click OK to make the modifications.
- Use the QuickWatch window – You can use the QuickWatch window to view the value of a Transact-SQL expression, and then save that expression to a Watch window. (To select the Quick Watch window, choose Debug | Quick Watch.) To select an expression in QuickWatch, either select or enter the name of the expression in the Expression field of the Quick Watch window.
- Use the Quick Info pop-up – When you move the cursor over an SQL identifier, the Quick Info pop-up displays the name of the expression and its current value.