The administrative tasks that you can perform by using SQL Server Management Studio are, among others, the following:
- Register servers
- Connect to a server
- Create new server groups
- Manage multiple servers
- Start and stop servers
The following subsections describe these administrative tasks.
Registering Servers
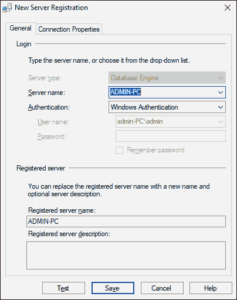
SQL Server Management Studio separates the activities of registering servers and exploring databases and their objects. (Both of these activities can be done using Object Explorer.) Every server (local or remote) must be registered before you can use its databases and objects. A server can be registered during the first execution of SQL Server Management Studio or later. To register a database server, right-click the folder of your database server in Object Explorer and choose Register. (If the Object Explorer pane doesn’t appear on your screen, select View ➜ Object Explorer.) The New Server Registration dialog box appears, as shown in Figure 3-3. Choose the name of the server that you want to register and the authentication mode (Windows Authentication or SQL Server Authentication). Click Save.

Connecting to a Server
SQL Server Management Studio also separates the tasks of registering a server and connecting to a server. This means that registering a server does not automatically connect you to the server. To connect to a server from the Object Explorer window, right-click the server name and choose Connect.
Creating a New Server Group
To create a new server group in the Registered Servers pane, right-click Local Server Groups and choose New Server Group. In the New Server Group properties dialog box, enter a (unique) group name and optionally describe the new group.
Managing Multiple Servers
SQL Server Management Studio allows you to administer multiple database servers (called instances) on one computer by using Object Explorer. Each instance of the Database Engine has its own set of database objects (system and user databases) that are not shared between different instances.
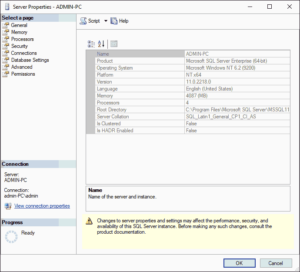
To manage a server and its configuration, right-click the server name in Object Explorer and choose Properties. The Server Properties dialog box that opens contains several different pages, such as General, Security, and Permissions.
The General page (see Figure 3-4) shows general properties of the server. The Security page contains the information concerning the authentication mode of the server and the login auditing mode. The Permissions page shows all logins and roles that can access the server. The lower part of the page shows all permissions that can be granted to the logins and roles.

You can replace the existing server name with a new name. Right-click the server in the Object Explorer window and choose Register. Now you can rename the server and modify the existing server description in the Registered Server frame.
Note – Do not rename servers, because changing names can affect other servers that reference them.
Starting and Stopping Servers
A Database Engine server starts automatically by default each time the Windows operating system starts. To start the server using SQL Server Management Studio, right-click the selected server in the Object Explorer pane and click Start in the context menu. The menu also contains Stop and Pause functions that you can use to stop or pause the activated server, respectively.
