You have seen how to scan the entire tree of the TreeView control by using a For Each. . .Next loop that iterates through the Nodes collection. This technique, however, requires that you know the structure of the tree, and you must write as many nested loops as there are nested levels of nodes. It works with simple trees, but it’s quite inefficient when it comes to mapping a file system to a TreeView control. The following section explains how to iterate through a TreeView control’s node, regardless of the nesting depth.
The TreeViewScan Example
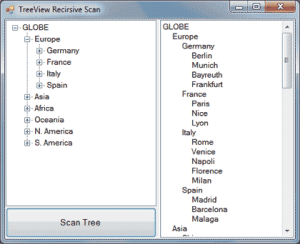
The TreeViewScan Example, whose main form is shown in Figure 4.28, demonstrates the process of scanning the nodes of a TreeView control. The form contains a TreeView control on the left, which is populated with the same data as the Globe project, and a ListBox control on the right, in which the tree’s nodes are listed. Child nodes in the ListBox control are indented according to the level to which they belong.

Figure 4.28 – TreeView Scan Example
Scanning the child nodes in a tree calls for a recursive procedure: a procedure that calls itself. Think of a tree structure that contains all the files and folders on your C: drive. If this structure contained no subfolders, you’d need to set up a loop to scan each folder, one after the other. Because most folders contain subfolders, the process must be interrupted at each folder to scan the subfolders of the current folder. The process of scanning a drive recursively is described in detail in Chapter, “Accessing Folders and Files.”
Recursive Scanning of the Nodes Collection
To scan the nodes of the TreeView1 control, start at the top node of the control by using the following statement:
ScanNode(GlobeTree.Nodes(0))Code language: VB.NET (vbnet)This is the code behind the Scan Tree button, and it doesn’t get any simpler. It calls the ScanNode() subroutine to scan the child nodes of a specific node, which is passed to the subroutine as an argument. GlobeTree.Nodes(0) is the root node. By passing the root node to the ScanNode() subroutine, we’re in effect asking it to scan the entire tree.
This example assumes that the TreeView control contains a single root node and that all other nodes are under the root node. If your control contains multiple root nodes, then you must set up a small loop and call the ScanNode() subroutine once for each root node:
For Each node In GlobeTree.Nodes
	ScanNode(node)
NextCode language: VB.NET (vbnet)
Let’s look now at the ScanNode() subroutine shown in Listing 4.45.
Listing 4.45: Scanning a Tree Recursively
Sub ScanNode(ByVal node As TreeNode)
	Dim thisNode As TreeNode
	Static indentationLevel As Integer
	Application.DoEvents()
	ListBox1.Items.Add(Space(indentationLevel) & node.Text)

	If node.Nodes.Count > 0 Then
		indentationLevel += 5
		For Each thisNode In node.Nodes
			ScanNode(thisNode)
		Next
		indentationLevel -= 5
	End If
End SubCode language: VB.NET (vbnet)
This subroutine is deceptively simple. First, it adds the caption of the current node to the ListBox1 control. If this node (represented by the Node variable) contains child nodes, the code must scan them all. The Node.Nodes.Count method returns the number of nodes under the current node; if this value is positive, we must scan all the items of the Node.Nodes collection. To do this, the ScanNode() subroutine must call itself, passing a different argument each time. If you’re familiar with recursive procedures, you’ll find the code quite simple. You may find the notion of a function calling itself a bit odd, but it’s no different from calling another function. The execution of the function that makes the call is suspended until the called function returns.
You can use the ScanNode() subroutine as is to scan any TreeView control. All you need is a reference to the root node (or the node you want to scan recursively), which you must pass to the ScanNode() subroutine as an argument. The subroutine will scan the entire subtree and display its nodes in a ListBox control. The nodes will be printed one after the other. To make the list easier to read, the code indents the names of the nodes by an amount that’s proportional to the nesting level. Nodes of the first level aren’t indented at all. Nodes on the second level are indented by 5 spaces, nodes on the third level are indented by 10 spaces, and so on. The variable indentationLevel keeps track of the nesting level and is used to specify the indentation of the corresponding node. It’s increased by 5 when we start scanning a new subordinate node and decreased by the same amount when we return to the next level up. The indentationLevel variable is declared as Static so that it maintains its value between calls.
Run the TreeViewScan Example and expand all nodes. Then click the Scan Tree button to populate the list on the right with the names of the continents/countries/cities. Obviously, the ListBox control is not a substitute for the TreeView control. The data have no particular structure; even when the names are indented, there are no tree lines connecting the nodes, and users can’t expand and collapse the control’s contents.


