Generally, there are three steps to follow if you want to create a job:
- Create a job and its steps.
- Create a schedule of the job execution if the job is not to be executed on demand.
- Notify operators about the status of the job.
The following sections explain these steps using an example.
Creating a Job and Its Steps
A job may contain one or more steps. There are different ways in which a job step can be defined. The following list contains some of them.
- Using Transact-SQL statements – Many job steps contain Transact-SQL statements. For example, if you want to automate database or transaction log backups, you use the BACKUP DATABASE statement or BACKUP LOG statement, respectively.
- Using the operating system (CmdExec) – Some jobs may require the execution of a SQL Server utility, which usually will be started with the corresponding command. For example, if you want to automate the data transfer from your database server to a data file, or vice versa, you could use the bcp utility.
- Invoking a program – As another alternative, it may be necessary to execute a program that has been developed using Visual Basic or some other programming language. In this case, you should always include the path drive letter in the Command text box when you start such a program. This is necessary because SQL Server Agent has to find the executable file.
If the job contains several steps, it is important to determine which actions should be taken in case of a failure. Generally, the Database Engine starts the next job step if the previous one was successfully executed. However, if a job step fails, any job steps that follow will not be executed. Therefore, you should always specify how often each step should be retried in the case of failure. And, of course, it will be necessary to eliminate the reason for the abnormal termination of the job step. (Obviously, a repeated job execution will always lead to the same error if the cause is not repaired.)
Note – The number of attempts depends on the type and content of the executed job step (batch, command, or application program).
You can create a job using the following:
- SQL Server Management Studio
- System stored procedures (sp_add_job and sp_add_jobstep)
SQL Server Management Studio is used in this example, which creates a job that backs up the sample database. To create this job, connect to an instance of the Database Engine in Object Explorer and then expand that instance. Expand SQL Server Agent, right-click Jobs, and choose New Job. (SQL Server Agent must be running.) The New Job dialog box appears (see Figure 17-2). On the General page, enter a name for the job in the Name box. (The name of the job for backing up the sample database will be backup_sample.)
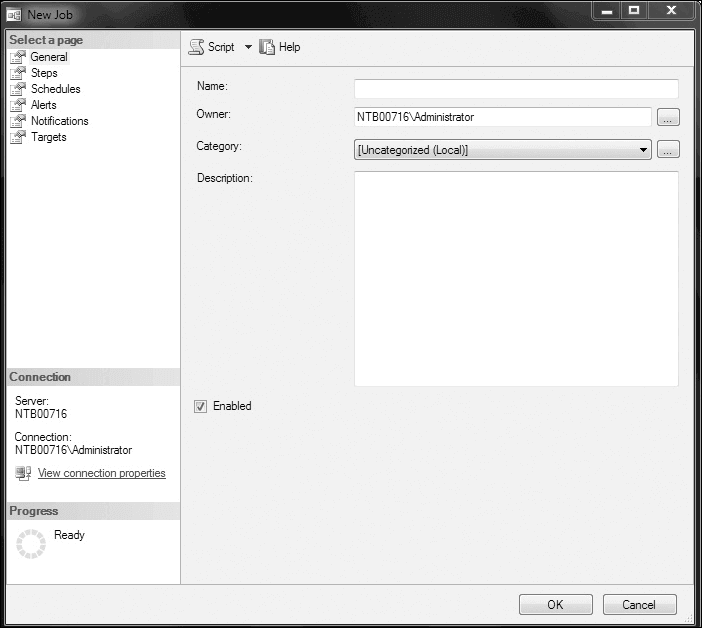
For the Owner field, click the ellipsis (…) button and choose the owner responsible for performing the job. In the Category drop-down list, choose the category to which the job belongs. You can add a description of the job in the Description box, if you wish.
Note – If you have to manage several jobs, categorizing them is recommended. This is especially useful if your jobs are executed in a multiserver environment.
Check the Enabled check box to enable the job.
Note – All jobs are enabled by default. SQL Server Agent disables jobs if the job schedule is defined either at a specific time that has passed or on a recurring basis with an end date that has also passed. In both cases, you must reenable the job manually.
Each job must have one or more steps. Therefore, in addition to defining job properties, you must create at least one step before you can save the job. To define one or more steps, click the Steps page in the New Job dialog box and click New. The New Job Step dialog box appears, as shown in Figure 17-3. Enter a name for the job step. (It is called backup in the example.) In the Type drop-down list, choose Transact-SQL script (T-SQL), because the backup of the sample database will be executed using the Transact-SQL statement BACKUP DATABASE.
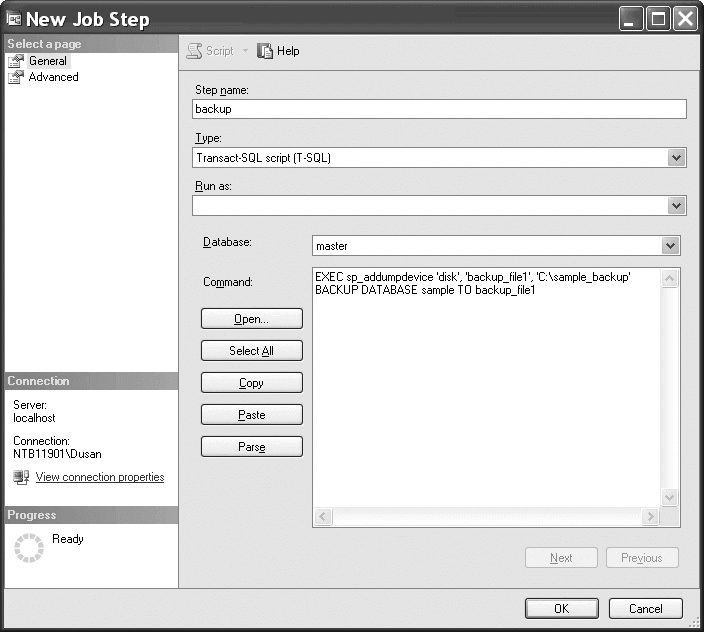
In the Database drop-down list, choose the master database, because this system database must be the current database if you want to back up a database.
You can either enter the Transact-SQL statement directly in the Command box or invoke it from a file. In the former case, enter the following statements, after you change the path for the backup file:
EXEC sp_addumpdevice 'disk', 'backup_file1', 'C:\sample_backup'
BACKUP DATABASE sample TO backup_file1Code language: SQL (Structured Query Language) (sql)
As you probably guessed, the sp_addumpdevice system procedure adds a backup device to an instance of the Database Engine. To invoke the Transact-SQL statement from a file, click Open and select the file. The syntax of the statement(s) can be checked by clicking Parse.
Creating a Job Schedule
Each created job can be executed on demand (that is, manually by the user) or by using one or more schedules. A scheduled job can occur at a specific time or on a recurring schedule.
Note – Each job can have multiple schedules. For example, the backup of the transaction log of a production database can be executed with two different schedules, depending on the time of day. This means that during peak business hours, you can execute the backup more frequently than during non-peak hours.
To create a schedule for an existing job using SQL Server Management Studio, select the Schedules page in the Job Properties dialog box and click New. (The Job Properties dialog box is the same dialog box as shown in Figure 17-2). If the Job Properties dialog box is not active, expand SQL Server Agent, expand Jobs, and click the job you want to process.
Note – If you get the warning, “The On Access action of the last step will be changed from Get Next Step to Quit with Success,” click Yes.
The New Job Schedule dialog box appears (see Figure 17-4).
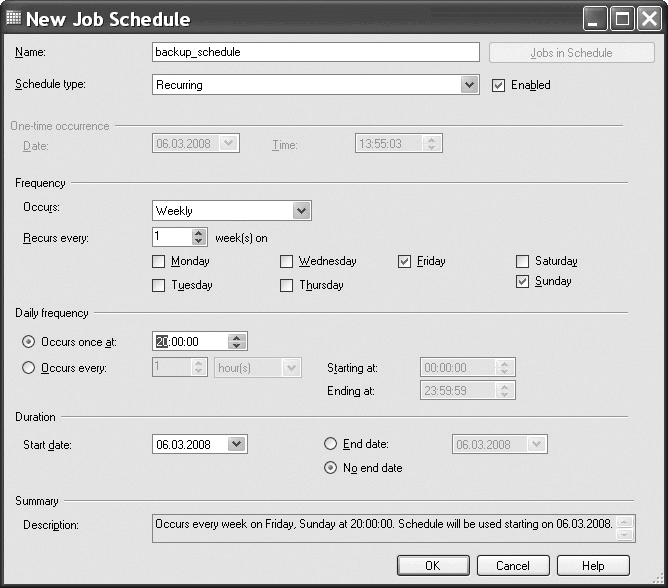
For the sample database, set the schedule for the backup to be executed every Friday at 8:00 p.m. To do this, enter the name in the Name dialog box and choose Recurring in the Schedule Type drop-down list. In the Frequency section, choose Weekly in the Occur drop-down list, and check Friday. In the Daily Frequency section, click the Occurs Once At radio button, and enter the time (20:00:00). In the Duration section, choose the start date in the Start Date drop-down list, and then click the End Date radio button and choose the end date in the corresponding drop-down list. (If the job should be scheduled without the end date, click No End Date.)
Notifying Operators About the Job Status
When a job completes, several methods of notification are possible. For example, you can instruct the system to write a corresponding message to the Windows Application log, hoping that the system administrator reads this log from time to time. A better choice is to explicitly notify one or more operators using e-mail, pager, and/or the net send command.
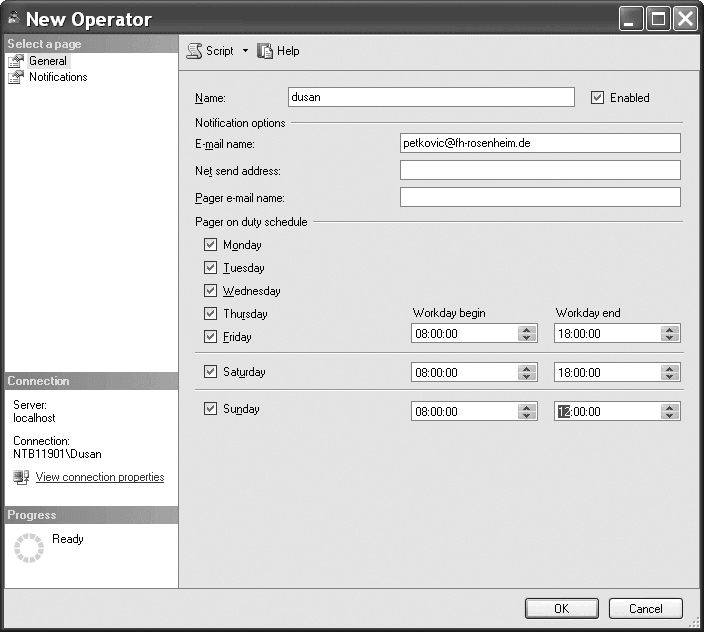
Before an operator can be assigned to a job, you have to create an entry for it. To create an operator using SQL Server Management Studio, expand SQL Server Agent, right-click Operators, and choose New Operator. The New Operator dialog box appears (see Figure 17-5). On the General page, enter the name of the operator in the Name box. Specify one or more methods of notifying the operator (via e-mail, pager, or the net send address). In the Pager on Duty Schedule section, enter the working hours of the operator.
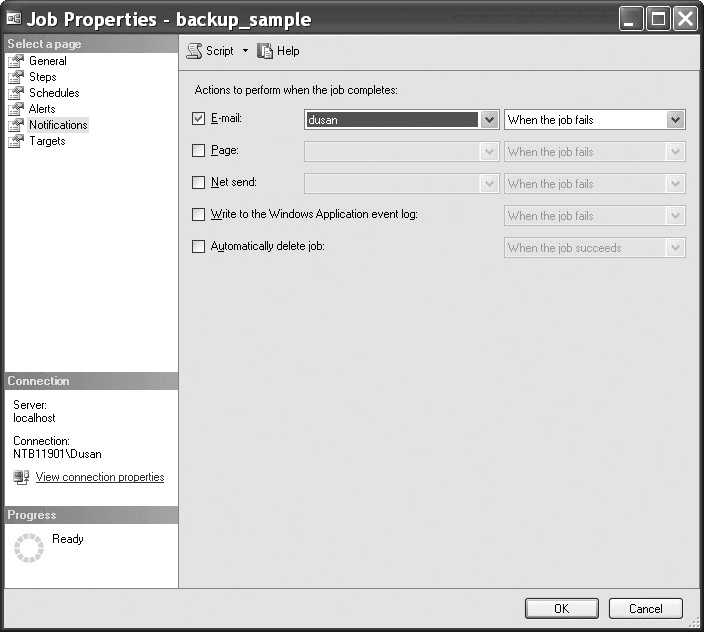
To notify one or more operators after the job finishes (successfully or unsuccessfully), return to the Job Properties dialog box of the job, select the Notifications page (see Figure 17-6), and check the corresponding boxes. (Besides e-mail, pager, or the net send command notification, in this dialog box you also have the option of writing the message to the Windows Application log and/or deleting the job.)
Viewing the Job History Log
The Database Engine stores the information concerning all job activities in the sysjobhistory system table of the msdb system database. Therefore, this table represents the job history log of your system. You can view the information in this table using SQL Server Management Studio. To do this, expand SQL Server Agent, expand Jobs, right-click the job, and choose View History. The Log File Viewer dialog box shows the history log of the job.
Each row of the job history log is displayed in the details pane, which contains, among other information, the following:
- Date and time when the job step occurred
- Whether the job step completed successfully or unsuccessfully
- Operators who were notified
- Duration of the job
- Errors or messages concerning the job step
By default, the maximum size of the job history log is 1000 rows, while the number of rows for a particular job is limited to 100. (The job history log is automatically cleared when the maximum size of rows is reached.) If you want to store the information about each job, and your system has several jobs, increase the size of the job history log and/or the number of rows per job. Using SQL Server Management Studio, right-click SQL Server Agent and choose Properties. In the SQL Server Agent Properties dialog box, select the History page and enter the new values for the maximum job history log size and maximum job history rows per job. You can also check Automatically Remove Agent History and specify a time interval after which logs should be deleted.
