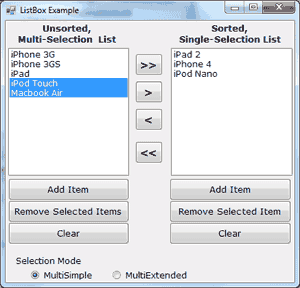
This Adding and Removing Item from a ListBox control example (shown in Figure 4.4) demonstrates the basic operations of the ListBox control. The two ListBox controls on the form operate slightly differently. The first has the default configuration: Only one item can be selected at a time, and new items are appended after the existing item. The second ListBox control has its Sorted property set to True and its MultiSelect property set according to the values of the two RadioButton controls at the bottom of the form.
The code for this exercise contains much of the logic you’ll need in your ListBox manipulation routines. It shows you how to do the following:
- Add and remove items at runtime
- Transfer items between lists at runtime
- Handle multiple selected items
- Maintain sorted lists

Figure 4.4 – Adding and removing items from a ListBox control
The Add Item Buttons
The Add Item buttons use the InputBox() function to prompt the user for input, and then they add the user-supplied string to the ListBox control. The code is identical for both buttons (see Listing 4.10).
Listing 4.10: The Add New Element Buttons
Private Sub bttnSourceAdd_Click(...) Handles bttnSourceAdd.Click
	Dim ListItem As String
	ListItem = InputBox("Enter new item's name")
	If ListItem.Trim <> "" Then
		sourceList.Items.Add(ListItem)
	End If
End SubCode language: VB.NET (vbnet)
Notice that the subroutine examines the data entered by the user to avoid adding blank strings to the list. The code for the Clear buttons is also straightforward; it simply calls the Clear method of the Items collection to remove all entries from the corresponding list.
Removing Items from the Two Lists
The code for the Remove Selected Item button is different from that for the Remove Selected Items button (both are presented in Listing 4.11). The code for the Remove Selected Item button removes the selected item, while the Remove Selected Items buttons must scan all the items of the left list and remove the selected one(s).
Listing 4.11: The Remove Buttons
Private Sub bttnDestinationRemove_Click(...) _
		Handles bttnDestinationRemove.Click
	destinationList.Items.Remove(destinationList.SelectedItem)
End Sub

Private Sub bttnSourceRemove_Click(...) _
		Handles bttnSourceRemove.Click
	Dim i As Integer
	For i = 0 To sourceList.SelectedIndices.Count - 1
		sourceList.Items.RemoveAt(sourceList.SelectedIndices(0))
	Next
End SubCode language: VB.NET (vbnet)
Even if it’s possible to remove an item by its value, this is not a safe approach. If two items have the same name, the Remove method will remove the first one. Unless you’ve provided the code to make sure that no identical items can be added to the list, remove them by their index, which is unique.
Notice that the code always removes the first item in the SelectedIndices collection. If you attempt to remove the item SelectedIndices(i), you will remove the first selected item, but after that you will not remove all the selected items. After removing an item from the selection, the remaining items are no longer at the same locations. (In effect, you have to refresh the SelectedIndices collection.) The second selected itemwill take the place of the first selected item, which was just deleted, and so on. By removing the first item in the SelectedIndices collection, we make sure that all selected items, and only those items, will be eventually removed.
Moving Items between Lists
The two single-arrow buttons that are between the ListBox controls shown in Figure 4.6 transfer selected items from one list to another. The button with the single arrow pointing to the right transfers the items selected in the left list, after it ensures that the list contains at least one selected item. Its code is presented in Listing 4.12. First, it adds the item to the second list, and then it removes the item from the original list. Notice that the code removes an item by passing it as an argument to the Remove method because it doesn’t make any difference which one of two identical objects will be removed.
Listing 4.12: Moving the Selected Items
Private Sub bttnSourceMove_Click(...) _
		Handles bttnSourceMove.Click
	While sourceList.SelectedIndices.Count > 0
		destinationList.Items.Add(sourceList.Items( _
			sourceList.SelectedIndices(0)))
		sourceList.Items.Remove(sourceList.Items( _
			sourceList.SelectedIndices(0)))
	End While
End SubCode language: VB.NET (vbnet)
The second single-arrow button transfers items in the opposite direction. The destination control (the one on the right) doesn’t allow the selection of multiple items, so you could use the SelectedIndex and SelectedItem properties. Because the single selected element is also part of the SelectedItems collection, you need not use a different approach. The statements that move a single item from the right to the left ListBox are shown next:
sourceList.Items.Add(destinationList.SelectedItem)
destinationList.Items.RemoveAt( _
	destinationList.SelectedIndex)Code language: VB.NET (vbnet)

