

The Framework provides several drawing methods, one for each basic shape. You can create much more elaborate shapes by combining the methods described in the following sections.
All drawing methods have a few things in common. The first argument is always a Pen object, which will be used to render the shape on the Graphics object. The following arguments are the parameters of a shape: They determine the location and dimensions of the shape. The DrawLine method, for example, needs to know the endpoints of the line to draw, whereas the DrawRectangle method needs to know the origin and dimensions of the rectangle to draw. The parameters needed to render the shape are passed as arguments to each drawing method, following the Pen object.
The drawing methods can also be categorized in two major groups: the methods that draw stroked shapes (outlines) and the methods that draw filled shapes. The methods in the first group start with the Draw prefix (DrawRectangle, DrawEllipse, and so on). The methods of the second group start with the Fill prefix (FillRectangle, FillEllipse, and so on). Of course, some DrawXXX methods don’t have an equivalent FillXXX method. For example, you can’t fill a line or an open curve, so there are no FillLine or FillCurve methods.
Another difference between the drawing and filling methods is that the filling methods use a Brush object to fill the shape — you can’t fill a shape with a pen. So, the first argument of the methods that draw filled shapes is a Brush object, not a Pen object. The remaining arguments are the same because you must still specify the shape to be filled. In the following sections, I present in detail the shape-drawing methods but not the shape-filling methods. If you can use a drawing method, you can just as easily use its filling counterpart.
Table 14.4 shows the names of the drawing methods. The first column contains the methods for drawing stroked shapes, and the second column contains the corresponding methods for drawing filled shapes (if there’s a matching method).
Table 14.4 – The Drawing Methods
| Drawing Method | Filling Method | Description |
|---|---|---|
| DrawArc | Draws an arc | |
| DrawBezier | Draws very smooth curves with fixed endpoints, whose exact shape is determined by two control points | |
| DrawBeziers | Draws multiple Bezier curves in a single call | |
| DrawClosedCurve | FillClosedCurve | Draws a closed curve |
| DrawCurve | Draws curves that pass through certain points | |
| DrawEllipse | FillEllipse | Draws an ellipse |
| DrawIcon | Renders an icon on the Graphics object | |
| DrawImage | Renders an image on the Graphics object | |
| DrawLine | Draws a line segment | |
| DrawLines | Draws multiple line segments in a single call | |
| DrawPath | FillPath | Draws a GraphicsPath object |
| DrawPie | FillPie | Draws a pie section |
| DrawPolygon | FillPolygon | Draws a polygon (a series of line segments between points) |
| DrawRectangle | FillRectangle | Draws a rectangle |
| DrawRectangles | FillRectangles | Draws multiple rectangles in a single call |
| DrawString | Draws a string in the specified font on the drawing surface | |
| FillRegion | Fills a Region object |
Some of the drawing methods allow you to draw multiple shapes of the same type, and they’re properly named DrawLines, DrawRectangles, and DrawBeziers. We simply supply more shapes as arguments, and they’re drawn one after the other with a single call to the corresponding method. The multiple shapes are stored in arrays of the same type as the individual shapes. The DrawRectangle method, for example, accepts as an argument the Rectangle object to be drawn. The DrawRectangles method accepts as an argument an array of Rectangle objects and draws all of them at once.
DrawLine
The DrawLine method draws a straight-line segment between two points with a pen supplied as an argument. The simplest forms of the DrawLine method are the following, where point1 and point2 are either Point or PointF objects, depending on the coordinate system in use:
Graphics.DrawLine(pen, X1, Y1, X2, Y2)
Graphics.DrawLine(pen, point1, point2)Code language: CSS (css)
DrawRectangle
The DrawRectangle method draws a stroked rectangle and has two forms:
Graphics.DrawRectangle(pen, rectangle)
Graphics.DrawRectangle(pen, X1, Y1, width, height)Code language: CSS (css)
The rectangle argument is a Rectangle object that specifies the shape to be drawn. In the second form of the method, the arguments X1 and Y1 are the coordinates of the rectangle’s top-left corner, and the other two arguments are the dimensions of the rectangle. All these arguments can be integers or singles, depending on the coordinate system in use. However, they must be all of the same type.
The following statements draw two rectangles, one inside the other. The outer rectangle is drawn with a red pen with the default width, whereas the inner rectangle is drawn with a 3-pixel-wide green pen and is centered within the outer rectangle:
G.DrawRectangle(Pens.Red, 100, 100, 200, 100)
G.DrawRectangle(New Pen(Color.Green, 3), 125, 125, 150, 50)Code language: CSS (css)
DrawEllipse
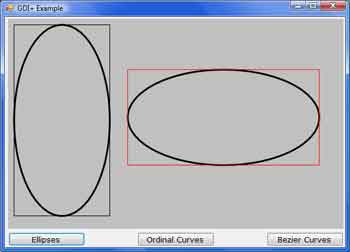
An ellipse is an oval or circular shape, determined by the rectangle that encloses it. The two dimensions of this rectangle are the ellipse’s major and minor diameters. Instead of giving you a mathematically correct definition of an ellipse, I prepared a few ellipses with different ratios of their two diameters (these ellipses are shown in Figure 14.7). The figure was prepared with the GDIPlus sample application (download here), which demonstrates a few more graphics operations. The ellipse is oblong along the direction of the major diameter and squashed along the direction of the minor diameter. If the two diameters are exactly equal, the ellipse becomes a circle. Indeed, the circle is just a special case of the ellipse, and there’s no DrawCircle method.
To draw an ellipse, call the DrawEllipse method, which has two basic forms:
Graphics.DrawEllipse(pen, rectangle)
Graphics.DrawEllipse(pen, X1, Y1, width, height)Code language: CSS (css)
The arguments are the same as with the DrawRectangle method because an ellipse is basically a circle deformed to fit in a rectangle. The two ellipses and their enclosing rectangles shown in Figure 14.7 were generated with the statements of Listing 14.5.
Listing 14.5: Drawing Ellipses and Their Enclosing Rectangles
Private Sub bttnEllipses_Click(ByVal sender As System.Object, _
		ByVal e As System.EventArgs) Handles bttnEllipses.Click
	Dim G As Graphics
	G = PictureBox1.CreateGraphics
	G.Clear(PictureBox1.BackColor)
	G.SmoothingMode = Drawing.Drawing2D.SmoothingMode.AntiAlias
	G.FillRectangle(Brushes.Silver, ClientRectangle)
	Dim R1, R2 As Rectangle
	R1 = New Rectangle(10, 10, 160, 320)
	R2 = New Rectangle(200, 85, 320, 160)

	G.DrawEllipse(New Pen(Color.Black, 3), R1)
	G.DrawRectangle(Pens.Black, R1)
	G.DrawEllipse(New Pen(Color.Black, 3), R2)
	G.DrawRectangle(Pens.Red, R2)
End SubCode language: PHP (php)
The ellipses were drawn with a 3-pixel-wide pen. As you can see in the figure, the width of the ellipse is split to the inside and outside of the enclosing rectangle, which is drawn with a 1-pixel-wide pen (download source code).
DrawPie
A pie is a shape similar to a slice of pie (an arc along with the two line segments that connect its endpoints to the center of the circle or the ellipse, to which the arc belongs). The DrawPie method accepts as arguments the pen with which it will draw the shape, the circle to which the pie belongs, the arc’s starting angle, and its sweep angle. The circle (or the ellipse) of the pie is defined with a rectangle. The starting and sweeping angles are measured clockwise. The DrawPie method has two forms:
Graphics.DrawPie(pen, rectangle, start, sweep)
Graphics.DrawPie(pen, X, Y, width, height, start, sweep)Code language: CSS (css)
The two forms of the method differ in how the rectangle is defined (a Rectangle object versus its coordinates and dimensions). The start argument is the pie’s starting angle, and sweep is the angle of the pie. The ending angle is start + sweep. Angles are measured in degrees (there are 360 degrees in a circle) and increase in a clockwise direction. The 0 angle corresponds to the horizontal axis.
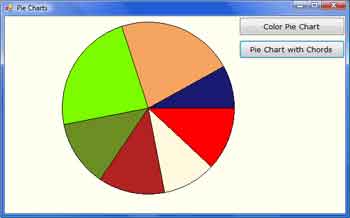
The statements of Listing 14.6 create a pie chart by drawing individual pie slices. Each pie starts where the previous one ends, and the sweeping angles of all pies add up to 360 degrees, which corresponds to a full rotation (a full circle). Unlike the other samples of this section, I’ve used the FillPie method, because we hardly ever draw the outlines of the pies; we fill each one with a different color instead. Figure 14.8 shows the output produced by Listing 14.6.
Listing 14.6: Drawing a Simple Pie Chart with the FillPie Methods
Private Sub bttnPie_Click(ByVal sender As System.Object, _
		ByVal e As System.EventArgs) Handles Button2.Click
	Dim g As System.Drawing.Graphics
	g = Me.CreateGraphics
	Dim brush As System.Drawing.SolidBrush
	Dim rect As Rectangle
	brush = New System.Drawing.SolidBrush(Color.Green)
	Dim Angles() As Single = {0, 43, 79, 124, 169, 252, 331, 360}
	Dim colors() As Color = {Color.Red, Color.Cornsilk, _
			Color.Firebrick, Color.OliveDrab, Color.LawnGreen, _
			Color.SandyBrown, Color.MidnightBlue}
	g.Clear(Color.Ivory)
	rect = New Rectangle(100, 10, 300, 300)
	Dim angle As Integer
	For angle = 1 To Angles.GetUpperBound(0)
		brush.Color = colors(angle - 1)
		g.FillPie(brush, rect, Angles(angle - 1), _
				Angles(angle) - Angles(angle - 1))
	Next
	g.DrawEllipse(Pens.Black, rect)
End SubCode language: PHP (php)
The code sets up two arrays: one with angles and another with colors. The Angles array holds the starting angle of each pie. The sweep angle of each pie is the difference between its own starting angle and the starting angle of the following pie. The sweep angle of the first pie is Angles(1) Angles(0), which is 43 degrees. The loop goes through each pie and draws it with a color it picks from the Colors array, based on the angles stored in the Angles array. In your application, you must calculate the total of a quantity (such as all customers, or all units of a product sold in a territory) and then use the individual percentages to set the starting and ending angles of each pie. If there are 800 customers and 20 of them belong to a specific area, this area’s sweep angle should be 1/40 of the circle, which is 9 degrees.
Notice that the FillPie method doesn’t connect the pie’s endpoints to the center of the ellipse. The second button on the PieChart project’s form draws the same pie chart, but it also connects each slice’s endpoints to the center of the circle. The code behind this button is identical to the code shown in Listing 14.6 — with the exception that after calling the FillPie method, it calls the DrawPie method to draw the outline of the pie. (download source code)
DrawPolygon
The DrawPolygon method draws an arbitrary polygon. It accepts two arguments: the Pen that it will use to render the polygon and an array of points that define the polygon. The polygon has as many sides (or vertices) as there are points in the array, and it’s always closed, even if the first and last points are not identical. In fact, you do not need to repeat the starting point at the end because the polygon will be automatically closed. The syntax of the DrawPolygon method is the following:
Graphics.DrawPolygon(pen, points())Code language: CSS (css)where points is an array of points, which can be declared with a statement like the following:
Dim points() As Point = {New Point(x1, y1), New Point(x2, y2), ...}Code language: PHP (php)DrawCurve
Curves are smooth lines drawn as cardinal splines. A real spline is a flexible object (made of soft wood) that designers used to flex on the drawing surface with spikes. The spline goes through all the fixed points and assumes the smoothest possible shape, given the restrictions imposed by the spikes. If the spline isn’t flexible enough, it breaks. In modern computer graphics, there are mathematical formulas that describe the path of the spline through the fixed points and take into consideration the tension (the degree of flexibility) of the spline. A more flexible spline yields a curve that bends easily. Less-flexible splines do not bend easily around their fixed points. Computer-generated splines do not break, but they can take unexpected shapes.
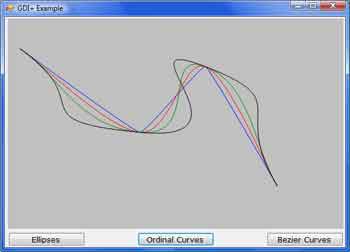
To draw a curve with the DrawCurve method, you specify the locations of the spikes (the points that the spline must go through) and the spline’s tension. If the tension is 0, the spline is totally flexible, like a rubber band: All the segments between points are straight lines. The higher the tension, the smoother the curve will be. Figure 14.8 shows four curves passing through the same points, but each curve is drawn with a different tension value. The curves shown in the figure were drawn with the GDIPlus project (using the Ordinal Curves button).
The simplest form of the DrawCurve method has the following syntax, where points is an array of points:
Graphics.DrawCurve(pen, points, tension)Code language: CSS (css)The first and last elements of the array are the curve’s endpoints, and the curve will go through the remaining points as well.
The curves shown in Figure 14.9 were produced by the code shown in Listing 14.7. Notice that a tension of 0.5 is practically the same as 0 (the spline bends around the fixed points like a rubber band). If you drew the same curve with a tension of 5, you’d get an odd curve indeed because although a physical spline would break, the mathematical spline takes an unusual shape to accommodate the fixed points. (download source code)
Listing 14.7: Curves with Common Fixed Points and Different Tensions
Private Sub bttnCurves_Click(ByVal sender As System.Object, _
		ByVal e As System.EventArgs) Handles bttnCurves.Click
	Dim G As Graphics
	G = PictureBox1.CreateGraphics
	G.Clear(PictureBox1.BackColor)
	G.FillRectangle(Brushes.Silver, ClientRectangle)
	G.SmoothingMode = Drawing.Drawing2D.SmoothingMode.HighQuality
	Dim points() As Point = {New Point(20, 50), New Point(220, 190), _
								 New Point(330, 80), New Point(450, 280)}
	G.DrawCurve(Pens.Blue, points, 0.1)
	G.DrawCurve(Pens.Red, points, 0.5)
	G.DrawCurve(Pens.Green, points, 1)
	G.DrawCurve(Pens.Black, points, 2)
End SubCode language: PHP (php)
DrawBezier
The DrawBezier method draws Bezier curves, which are smoother than cardinal splines. A Bezier curve is defined by two endpoints and two control points. The control points act as magnets. The curve is the trace of a point that starts at one of the endpoints and moves toward the second one. As it moves, the point is attracted by the two control points. Initially, the first control point’s influence is predominant. Gradually, the curve comes into the second control point’s field and it ends at the second endpoint.
The DrawBezier method accepts a pen and four points as arguments:
Graphics.DrawBexier(pen, X1, Y1, X2, Y2, X3, Y3, X4, Y4)
Graphics.DrawBezier(pen, point1, point2, point3, point4)Code language: CSS (css)
Figure 14.10 shows four Bezier curves, which differ in the y-coordinate of the third control point. All control points are marked with little squares: one each for the three points that are common to all curves, and four in a vertical column for the point that differs in each curve.
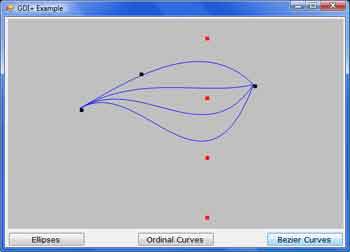
The code of Listing 14.8 draws the four Bezier curves (I’m not showing the statements that draw the small rectangles; they simply call the FillRectangle method). The endpoints and one control point (P1, P2, and P4) remain the same, whereas the other control point (P3) is set to four different values. Notice how far the control point must go to have a significant effect on the curve’s shape.
Listing 14.8: Drawing Bezier Curves and Their Control Points
Private Sub bttnBezier_Click(ByVal sender As System.Object, _
		ByVal e As System.EventArgs) Handles bttnBezier.Click

	Dim G As Graphics
	G = PictureBox1.CreateGraphics
	G.Clear(PictureBox1.BackColor)
	G.SmoothingMode = Drawing.Drawing2D.SmoothingMode.AntiAlias
	G.FillRectangle(Brushes.Silver, ClientRectangle)
	Dim P1 As New Point(120, 150)
	Dim P2 As New Point(220, 90)
	Dim P3 As New Point(330, 30)
	Dim P4 As New Point(410, 110)
	Dim sqrSize As New Size(6, 6)
	G.FillRectangle(Brushes.Black, New Rectangle(P1, sqrSize))
	G.FillRectangle(Brushes.Black, New Rectangle(P2, sqrSize))
	G.FillRectangle(Brushes.Red, New Rectangle(P3, sqrSize))
	G.FillRectangle(Brushes.Black, New Rectangle(P4, sqrSize))
	G.DrawBezier(Pens.Blue, P1, P2, P3, P4)
	P3 = New Point(330, 130)
	G.FillRectangle(Brushes.Red, New Rectangle(P3, sqrSize))
	G.DrawBezier(Pens.Blue, P1, P2, P3, P4)

	P3 = New Point(330, 230)
	G.FillRectangle(Brushes.Red, New Rectangle(P3, sqrSize))
	G.DrawBezier(Pens.Blue, P1, P2, P3, P4)

	P3 = New Point(330, 330)
	G.FillRectangle(Brushes.Red, New Rectangle(P3, sqrSize))
	G.DrawBezier(Pens.Blue, P1, P2, P3, P4)

End SubCode language: PHP (php)
To draw the curve, all you need is to specify the four control points and pass them along with a Pen object to the DrawBezier method. (download source code)
DrawPath
This method accepts a Pen object and a Path object as arguments and renders the specified path on the screen:
Graphics.DrawPath(pen, path)Code language: CSS (css)To construct the Path object, use the AddXXX methods (AddLine, AddRectangle, and so on) refer to the sub topic called “The Path Class,” earlier discussed in the section “Basic Drawing Objects“. You will find an example of how to use the Path object later in this chapter, when you’ll learn how to plot functions.
DrawString, MeasureString
The DrawString method renders a string in a single line or multiple lines. As a reminder, the TextRenderingHint property of the Graphics object allows you to specify the quality of the rendered text. The simplest form of the DrawString method is the following:
Graphics.DrawString(string, font, brush, X, Y)Code language: CSS (css)The first argument is the string to be rendered in the font specified by the second argument. The text will be rendered with the Brush object specified by the brush argument. X and Y, finally, are the coordinates of the top-left corner of a rectangle that completely encloses the string. While working with strings, in most cases you need to know the actual dimensions of the string when rendered with the DrawString method in the specified font. The MeasureString method allows you to retrieve the metrics of a string before actually drawing it. This method returns a SizeF structure with the width and height of the string when rendered on the same Graphics object with the specified font. We’ll use this method extensively in Chapter, “Printing with Visual Basic 2008,” to position text precisely on the printed page. You can also pass a Rectangle object as an argument to the MeasureString method to find out how many lines it will take to render the string on the rectangle.
The simplest form of the MeasureString method is the following, where string is the string to be rendered and font is the font in which the string will be rendered:
Dim textSize As SizeF
textSize = Me.Graphics.MeasureString(string, font)Code language: PHP (php)
To center a string on the form, use the x-coordinate returned by the MeasureString method, as in the following code segment:
Dim textSize As SizeF
Dim X As Integer, Y As Integer = 0
	textSize = Me.Graphics.MeasureString(string, font)
	X = (Me.Width - textSize.Width) / 2
G.DrawString("Centered string", font, brush, X, Y)Code language: PHP (php)
We subtract the rendered string’s length from the form’s width, and we split the difference in half at the two sides of the string.
Figure 14.11 shows a string printed at the center of the form and the two lines passing through the same point. Listing 14.9 shows the statements that produced the string. This listing is part of the TextEffects sample project.
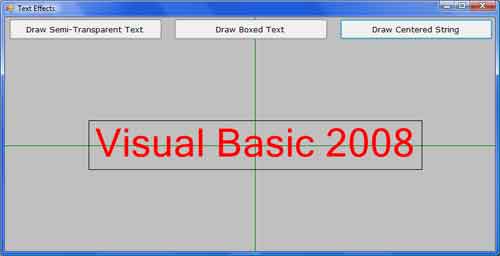
Listing 14.9: Printing a String Centered on the Form
Private Sub center(ByVal sender As System.Object, _
		ByVal e As System.EventArgs) Handles bttnCentered.Click

	Dim G As Graphics
	G = GetGraphicsObject()
	G.FillRectangle(New SolidBrush(Color.Silver), ClientRectangle)
	G.TextRenderingHint = Drawing.Text.TextRenderingHint.AntiAlias
	FontDialog1.Font = Me.Font
	FontDialog1.ShowDialog()
	Dim txtFont As Font
	txtFont = FontDialog1.Font
	G.DrawLine(New Pen(Color.Green), CInt(Me.Width / 2), _
			CInt(0), CInt(Me.Width / 2), CInt(Me.Height))
	G.DrawLine(New Pen(Color.Green), 0, CInt(Me.Height / 2), _
			CInt(Me.Width), CInt(Me.Height / 2))
	Dim drawString As String = "Visual Basic 2008"
	Dim txtSize As SizeF
	txtSize = G.MeasureString(drawString, txtFont)
	Dim txtX, txtY As Integer
	txtX = (Me.Width - txtSize.Width) / 2
	txtY = (Me.Height - txtSize.Height) / 2
	G.DrawString(drawString, txtFont, New SolidBrush(Color.Red), txtX, txtY)
	Dim boxSize As SizeF
	boxSize = G.MeasureString(drawString, txtFont)
	G.DrawRectangle(Pens.Black, txtX, txtY, boxSize.Width, boxSize.Height)
	Me.Invalidate()

End SubCode language: PHP (php)
The coordinates passed to the DrawString method (variables txtX and txtY) are the coordinates of the top-left corner of the rectangle that encloses the first character of the string. Another form of the DrawString method accepts a rectangle as an argument and draws the string in this rectangle, breaking the text into multiple lines if needed. The syntax of this form of the method is as follows:
Graphics.DrawString(string, font, brush, rectanglef)
Graphics.DrawString(string, font, brush, rectanglef, stringFormat)Code language: CSS (css)
If you want to render text in a box, you will most likely use the equivalent form of the MeasureString method to retrieve the metrics of the text in the rectangle. This form of the MeasureString method returns the number of lines it will take to render the string in the supplied rectangle, and it has the following syntax, where string is the text to be rendered, and font is the font in which the string will be rendered:
e.Graphics.MeasureString(string, font, fitSize, stringFormat, lines, cols)Code language: CSS (css)The fitSize argument is a SizeF object that represents the width and height of a rectangle, where the string must fit. The lines and cols variables are passed by reference, and they are set by the MeasureString method to the number of lines and number of characters that will fit in the specified rectangle. The exact location of the rectangle doesn’t make any difference — only its dimensions matter, and that’s why the third argument is a SizeF object, not a Rectangle object. Figure 14.12 shows a string printed in two different rectangles by the TextEffects sample project; the figure was created with the Draw Boxed Text button. The code that produced the figure is shown in Listing 14.10.
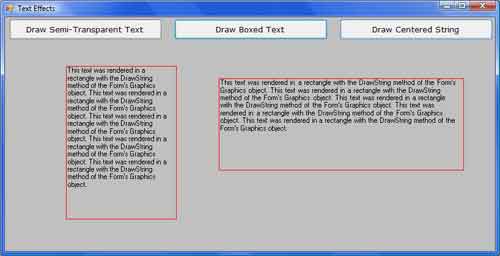
Listing 14.10: Printing Text in a Rectangle
Private Sub BoxedText(ByVal sender As System.Object, _
		ByVal e As System.EventArgs) Handles bttnBoxed.Click
	Dim G As Graphics
	G = GetGraphicsObject()
	G.FillRectangle(New SolidBrush(Color.Silver), ClientRectangle)
	FontDialog1.Font = Me.Font
	FontDialog1.ShowDialog()
	Dim txtFont As Font
	txtFont = FontDialog1.Font
	Dim txt As String = "This text was rendered in a rectangle with the " & _
			"DrawString method of the Form's Graphics object. "
	txt = txt & txt & txt & txt & txt
	G.DrawString(txt, txtFont, Brushes.Black, New RectangleF(100, 80, 180, 250))
	G.DrawRectangle(Pens.Red, 100, 80, 180, 250)
	G.DrawString(txt, txtFont, Brushes.Black, New RectangleF(350, 100, 400, 150))
	G.DrawRectangle(Pens.Red, 350, 100, 400, 150)
	Me.Invalidate()
End SubCode language: PHP (php)
The StringFormat Object
Some of the overloaded forms of the DrawString method accept an argument of the StringFormat type. This argument determines characteristics of the text and exposes a few properties of its own, which include the following:
- Alignment – Determines the alignment of the text; its value is a member of the StringAlignment enumeration: Center (text is aligned in the center of the layout rectangle), Far (text is aligned far from the origin of the layout rectangle), and Near (text is aligned near the origin of the layout rectangle).
- Trimming – Determines how text will be trimmed if it doesn’t fit in the layout rectangle. Its value is one of the members of the StringTrimming enumeration: Character (text is trimmed to the nearest character), EllipsisCharacter (text is trimmed to the nearest character and an ellipsis is inserted at the end to indicate that some of the text is missing), EllipsisPath (text at the middle of the string is removed and replaced by an ellipsis), EllipsisWord (text is trimmed to the nearest word and an ellipsis is inserted at the end), None (no trimming), and Word (text is trimmed to the nearest word).
- FormatFlags – Specifies layout information for the string. Its value can be one of the members of the StringFormatFlags enumeration. The two members of this enumeration that you might need often are DirectionRightToLeft (prints to the left of the specified point) and DirectionVertical.
To use the stringFormat argument of the DrawString method, instantiate a variable of this type, set the desired properties, and then pass it as an argument to the DrawString method, as shown here:
Dim G As Graphics = Me.CreateGraphics
Dim SF As New StringFormat()
SF.FormatFlags = StringFormatFlags.DirectionVertical
G.DrawString("Visual Basic", Me.Font, Brushes.Red, 80, 80, SF)Code language: PHP (php)
The call to the DrawString method will print the string from top to bottom. It will also rotate the characters. The DirectionRightToLeft setting will cause the DrawString method to print the string to the left of the specified point, but it will not mirror the characters.
You can find additional examples of the MeasureString method in Chapter “Printing with Visual Basic”, in which we’ll use this method to fit strings on the width of the page. The third button on the form of the TextEffects project draws text with a three-dimensional look by overlaying a semitransparent string over an opaque string. This technique is explained in the “Alpha Blending” section in Chapter “Manipulating Images and Bitmaps”, in which you’ll learn how to use transparency. You might also wonder why none of the DrawString methods’ forms accept as an argument an angle of rotation for the text. You can draw text or any shape at any orientation as long as you set up the proper rotation transformation. This topic is discussed in the “Applying Transformations” section later in this chapter, as well as in Chapter “Printing with Visual Basic”.
DrawImage
The DrawImage method, which renders an image on the Graphics object, is a heavily overloaded and quite flexiblemethod. The following form of themethod draws the image at the specified location. Both the image and the location of its top-left corner are passed to the method as arguments (as Image and Point arguments, respectively):
Graphics.DrawImage(img, point)Code language: CSS (css)Another form of the method draws the specified image within a rectangle. If the rectangle doesn’t match the original dimensions of the image, the image will be stretched to fit in the rectangle. The rectangle should have the same aspect ratio as the Image object, to avoid distorting the image in the process.
Graphics.DrawImage(img, rectangle)Code language: CSS (css)Another form of the method allows you to change not only the magnification of the image, but also its shape. This method accepts as an argument not a rectangle, but an array of three points that specifies a parallelogram. The image will be sheared to fit in the parallelogram, where points is an array of points that define a parallelogram:
Graphics.DrawImage(img, points())Code language: CSS (css)The array holds three points, which are the top-left, top-right, and bottom-left corners of the parallelogram. The fourth point is determined uniquely by the other three, and you need not supply it. The ImageCube sample project, shown later in this chapter, uses this overloaded form of the DrawImage method to draw a cube with a different image on each face. Another interesting form of the method allows you to set the attributes of the image:
Graphics.DrawImage(image, points(), srcRect, units, attributes)Code language: CSS (css)The first two arguments are the same as in the previous forms of the method. The srcRect argument is a rectangle that specifies the portion of image to draw, and units is a constant of the GraphicsUnit enumeration. It determines how the units of the rectangle are measured (pixels, inches, and so on). The last argument is an ImageAttributes object that contains information about the attributes of the image you want to change (such as the gamma value, and a transparent color value or color key). The properties of the ImageAttributes class are discussed shortly. The DrawImage method is quite flexible, and you can use it for many special effects, including wipes. A wipe is the gradual appearance of an image on a form or PictureBox control. You can use this method to draw stripes of the original image, or start with a small rectangle in the middle that grows gradually until it covers the entire image.
You can also correct the color of the image by specifying the attributes argument. To specify the attributes argument, create an ImageAttributes object with a statement like the following:
Dim attr As New System.Drawing.Imaging.ImageAttributesCode language: CSS (css)Then call one or more of the ImageAttributes class’s methods:
- SetWrapMode – Specifies the wrap mode that is used to decide how to tile a texture across a shape. This attribute is used with textured brushes (a topic that isn’t discussed in this tutorial).
- SetGamma – This method sets the gamma value for the image’s colors and accepts a Single value, which is the gamma value to be applied. A gamma value of 1 doesn’t affect the colors of the image. A smaller value darkens the colors, whereas a larger value makes the image colors brighter. Notice that the gamma correction isn’t the same as manipulating the brightness of the colors. The gamma correction takes into consideration the entire range of values in the image; it doesn’t apply equally to all the colors. In effect, it takes into consideration both the brightness and the contrast and corrects them in tandem with a fairly complicated algorithm. The syntax of the SetGamma method is as follows:
Dim attr As New System.Drawing.Imaging.ImageAttributes
The following statements render the image stored in the img Image object on the G Graphics object, and they gamma-correct the image in the process by a factor of 1.25:
Dim attrs As New System.Drawing.Imaging.ImageAttributes()
attrs.SetGamma(1.25)
Dim dest As New Rectangle(0, 0, PictureBox1.Width, PictureBox1.Height)
G.DrawImage(img, dest, 0, 0, img.Width, img.Height, _
		GraphicsUnit.Pixel, attrs)Code language: CSS (css)
