In this section, you’ll look at the tools for creating gradients. The techniques for gradients can get quite complicated, but I will limit the discussion to the types of gradients you’ll need for business or simple graphics applications.
Linear Gradients
Let’s start with linear gradients. Like all other gradients, they’re part of the System.Drawing class and are implemented as brushes. To draw a linear gradient, you must create an instance of the LinearGradientBrush class with a statement like the following:
Dim lgBrush As LinearGradientBrush
lgBrush = New LinearGradientBrush(rect, startColor, endColor, gradientMode)Code language: PHP (php)
To understand how to use the arguments, you must understand how the linear gradient works.
This method creates a gradient that fills a rectangle, specified by the rect object passed as the first argument. This rectangle isn’t filled with any gradient; it simply tells the method how long (or how tall) the gradient should be. The gradient starts with the startColor at the left side of the rectangle and ends with the endColor at the opposite side. The gradient changes color slowly as it moves from one end to the other. The last argument, gradientMode, specifies the direction of the gradient and can have one of the values shown in Table 14.5.
Table 14.5 – The LinearGradientMode Enumeration
| Value | Effect |
|---|---|
| BackwardDiagonal | The gradient fills the rectangle diagonally from the top-right corner (startColor) to the bottom-left corner (endColor). |
| ForwardDiagonal | The gradient fills the rectangle diagonally from the top-left corner (startColor) to the bottom-right corner (endColor). |
| Horizontal | The gradient fills the rectangle from left (startColor) to right (endColor). |
| Vertical | The gradient fills the rectangle from top (startColor) to bottom (endColor). |
Notice that in the descriptions of the various modes in the table, I state that the gradient fills the rectangle, not the shape. The gradient is calculated according to the dimensions of the rectangle specified with the first argument. If the actual shape is smaller than this rectangle, only a section of the gradient will be used to fill the shape. If the shape is larger than this rectangle, the gradient will repeat as many times as necessary to fill the shape. We usually fill a shape that’s as wide (or as tall) as the rectangle used to specify the gradient.
Let’s say you want to use the same gradient that extends 300 pixels horizontally to fill two rectangles: one that’s 200 pixels wide and another that’s 600 pixels wide. The first rectangle, which is 200 pixels wide, will be filled with two thirds of the gradient; the second rectangle, which is 600 pixels wide, will be filled with a gradient that’s repeated twice. The code in Listing 14.11 corresponds to the Linear Gradient button of the Gradients example (download here).
Listing 14.11: Filling Rectangles with a Linear Gradient
Private Sub LinearGradient_Click(ByVal sender As System.Object, _
		ByVal e As System.EventArgs) Handles bttnLinearGradient.Click
	Dim G As Graphics
	G = Me.CreateGraphics
	G.Clear(Me.BackColor)
	Dim R As New RectangleF(20, 20, 300, 100)
	Dim startColor As Color = Color.BlueViolet
	Dim EndColor As Color = Color.LightYellow
	Dim LGBrush As New LinearGradientBrush(R, startColor, _
			EndColor, LinearGradientMode.Horizontal)
	G.FillRectangle(LGBrush, New Rectangle(20, 20, 200, 100))
	G.FillRectangle(LGBrush, New Rectangle(20, 150, 600, 100))
End SubCode language: PHP (php)
For a horizontal gradient, only the width of the rectangle is used; the height is irrelevant. For a vertical gradient, only the height of the rectangle matters. When you draw a diagonal gradient, both dimensions are taken into consideration. You can create gradients at various directions by setting the gradientMode argument of the LinearGradientBrush object’s constructor. The Diagonal Linear Gradient button on the Gradients project does exactly that.
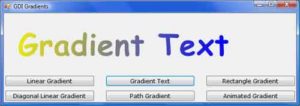
The button Gradient Text on the form of the Gradients project renders some text filled with a linear gradient. As you recall from our discussion of the DrawString method, strings are rendered with a Brush object, not a Pen object. If you specify a LinearGradientBrush object, the text will be rendered with a linear gradient. The text shown in Figure 14.13 was produced by the Gradient Text button, whose code is shown in Listing 14.12.

Listing 14.12: Rendering Stringswith a Linear Gradient
Private Sub bttnGradientText_Click(ByVal sender As System.Object, _
		ByVal e As System.EventArgs) Handles bttnGradientText.Click
	Dim G As Graphics
	G = Me.CreateGraphics
	G.Clear(Me.BackColor)
	G.TextRenderingHint = System.Drawing.Text.TextRenderingHint.AntiAlias
	Dim largeFont As New Font("Comic Sans MS", 48, _
			FontStyle.Bold, GraphicsUnit.Point)
	Dim gradientStart As New PointF(0, 0)
	Dim txt As String = "Gradient Text"
	Dim txtSize As New SizeF()
	txtSize = G.MeasureString(txt, largeFont)
	Dim gradientEnd As New PointF()
	gradientEnd.X = txtSize.Width
	gradientEnd.Y = txtSize.Height
	Dim grBrush As New LinearGradientBrush(gradientStart, _
		gradientEnd, Color.Yellow, Color.Blue)
	G.DrawString(txt, largeFont, grBrush, 20, 20)
End SubCode language: PHP (php)
The code of Listing 14.12 is a little longer than it could be (or than you might expect). Because linear gradients have a fixed size and don’t expand or shrink to fill the shape, you must call the MeasureString method to calculate the width of the string and then create a linear gradient with the exact same width. This way, the gradient’s extent matches that of the string.
Path Gradients
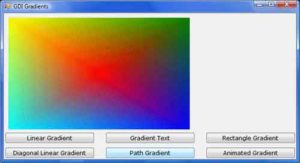
This is the ultimate gradient tool. Using a PathGradientBrush, you can create a gradient that starts at a single point and fades into multiple different colors in different directions. You can fill a rectangle starting from a point in the interior of the rectangle, which is colored, say, black. Each corner of the rectangle might have a different ending color. The PathGradientBrush will change color in the interior of the shape and will generate a gradient that’s smooth in all directions. Figure 14.14 shows a rectangle filled with a path gradient, although the gray shades on the printed page won’t show the full impact of the gradient. Open the Gradients project you downloaded earlier to see the same figure in color (use the Path Gradient button).

To fill a shape with a path gradient, you must first create a Path object. The PathGradientBrush will be created for the specific path and can be used to fill this path— but not any other shape. Actually, you can fill any other shape with the PathGradientBrush created for a specific path, but the gradient won’t fit the new shape. To create a PathGradientBrush, use the following syntax, where path is a properly initialized Path object:
Dim pgBrush As New PathGradientBrush(path)Code language: PHP (php)The pgBrush object provides properties that determine the exact coloring of the gradient. First, you must specify the color of the gradient at the center of the shape by using the CenterColor property. The SurroundColors property is an array with as many elements as there are vertices (corners) in the Path object. Each element of the SurroundColors arraymust be set to a color value, and the resulting gradient will have the color of the equivalent element of the SurroundColors array.
The following declaration creates an array of three different colors and assigns the colors to the SurroundColors property of a PathGradientBrush object:
Dim Colors() As Color = {Color.Yellow, Color.Green, Color.Blue}
pgBrush.SurroundColors = ColorsCode language: PHP (php)
After setting the PathGradientBrush, you can fill the corresponding Path object by calling the FillPath method. The Path Gradient button on the Gradient application’s main form creates a rectangle filled with a gradient that’s red in the middle of the rectangle and has a different color at each corner. Listing 14.13 shows the code behind the Path Gradient button.
Listing 14.13: Filling a Rectangle with a Path Gradient
Private Sub bttnPathGradient_Click(ByVal sender As System.Object, _
		ByVal e As System.EventArgs) Handles bttnPathGradient.Click
	Dim G As Graphics
	G = Me.CreateGraphics
	G.Clear(Me.BackColor)
	Dim path As New GraphicsPath()
	path.AddLine(New Point(10, 10), New Point(400, 10))
	path.AddLine(New Point(400, 10), New Point(400, 250))
	path.AddLine(New Point(400, 250), New Point(10, 250))
	Dim pathBrush As New PathGradientBrush(path)
	Dim centerColor As Color = Color.Red
	Dim surroundColors() As Color = {Color.Yellow, _
			Color.Green, Color.Blue, Color.Cyan}

	pathBrush.CenterColor = centerColor
	pathBrush.SurroundColors = surroundColors

	G.FillPath(pathBrush, path)
End SubCode language: PHP (php)
The gradient’s center point is, by default, the center of the shape. You can also specify the center of the gradient (the point that will be colored according to the CenterColor property). You can place the center point of the gradient anywhere by setting its CenterPoint property to a Point or PointF value.
The Gradients application has a few more buttons that create interesting gradients, which you can examine on your own. The Rectangle Gradient button fills a rectangle with a gradient that has a single ending color all around. All the elements of the SurroundColors property are set to the same color. The Animated Gradient animates the same gradient by changing the coordinates of the PathGradientBrush object’s CenterPoint property slowly over time.


