Anyone who has used drawing or image-processing applications already knows that many of the application’s tools use masks. A mask is any shape that limits the area in which you can draw. If you want to place a star or heart on an image and print something in it, you create the shape in which you want to limit your drawing tools and then you convert this shape into a mask. When you draw with the mask, you can start and end your strokes anywhere on the image. Your actions will have no effect outside of the mask, however.
The mask of the various image-processing applications is a clipping region, which can be anything, as long as it’s a closed shape. While the clipping region is activated, drawing takes place in the area of the clipping region. To specify a clipping region, you must call the SetClip method of the Graphics object. The SetClip method accepts the clipping area as an argument, and the clipping area can be the Graphics object itself (no clipping), a Rectangle, a Path, or a Region. A region is a structure made up of simple shapes, just like a path. There are many methods for creating a Region object— you can combine and intersect shapes, or exclude shapes from a region — but we aren’t going to discuss the Region object in this chapter because it’s not among the common objects we use to generate the type of graphics discussed in the context of this tutorial.
The SetClip method has the following forms:
Graphics.SetClip(Graphics)
Graphics.SetClip(Rectangle)
Graphics.SetClip(GraphicsPath)
Graphics.SetClip(Region)Code language: CSS (css)
All methods accept a second optional argument, which determines how the new clipping area will be combined with the existing one. The combineMode argument’s value is one of the members of the CombineMode enumeration: Complement, Exclude, Intersect, Replace, Union, and XOR.
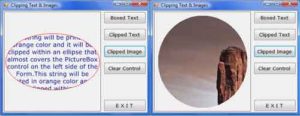
After a clipping area has been set for the Graphics object, drawing is limited to that area. You can specify any coordinates, but only the part of the drawing that falls inside the clipping area is visible. The Clipping project (download source code) demonstrates how to clip text and images within an elliptical area (see Figure 14.15). The Boxed Text button draws a string in a rectangle. The Clipped Text button draws the same text but first applies a clipping area, which is an ellipse. The Clipped Image button uses the same ellipse to clip an image. Because there’s no form of the SetClip method that accepts an ellipse as an argument, we must construct a Path object, add the ellipse to the path, and then create a clipping area based on the path.

The following statements create the clipping area for the text, which is an ellipse. The path is created by calling the AddEllipse method of the GraphicsPath object. This path is then passed as an argument to the Graphics object’s SetClip method:
Dim P As New System.Drawing.Drawing2D.GraphicsPath()
Dim clipRect As New RectangleF(30, 30, 250, 150)
P.AddEllipse(clipRect)
Dim G As Graphics
G = PictureBox1.CreateGraphics
G.SetClip(P)Code language: PHP (php)
Listing 14.14 shows the code behind the Boxed Text and Clipped Text buttons. The Boxed Text button prints some text in a rectangular area that is centered over the clipping area. The Clipped Text button shows how the text is printed within the rectangle. Both the rectangle and the ellipse are based on the same Rectangle object.
Listing 14.14: The Boxed Text and Clipped Text Buttons
Private Sub bttnBoxedText_Click(ByVal sender As System.Object, _
		ByVal e As System.EventArgs) Handles bttnBoxedText.Click
	Dim G As Graphics
	G = GetGraphicsObject()
	Dim Rect As New Rectangle(Convert.ToInt32((PictureBox1.Width - 250) / 2), _
			Convert.ToInt32((PictureBox1.Height - 150) / 2), 250, 150)
	G.ResetTransform()
	G.ResetClip()
	Dim format As StringFormat = New StringFormat()
	format.Alignment = StringAlignment.Center
	G.TextRenderingHint = Drawing.Text.TextRenderingHint.AntiAlias
	G.DrawString(txt & txt, New Font("Verdana", 12, FontStyle.Regular), _
			Brushes.DarkGreen, Rect, format)
	G.DrawRectangle(Pens.Yellow, Rect)
	PictureBox1.Invalidate()
End Sub


Private Sub bttnClippedText_Click(ByVal sender As System.Object, _
		ByVal e As System.EventArgs) Handles bttnClippedText.Click
	Dim G As Graphics
	G = GetGraphicsObject()
	Dim P As New System.Drawing.Drawing2D.GraphicsPath()
	Dim clipRect As New RectangleF(Convert.ToSingle((PictureBox1.Width - 250) / 2), _
			Convert.ToSingle((PictureBox1.Height - 150) / 2), 250, 150)
	P.AddEllipse(clipRect)
	G.ResetTransform()
	G.DrawEllipse(Pens.Red, clipRect)
	G.SetClip(P)
	Dim format As StringFormat = New StringFormat()
	format.Alignment = StringAlignment.Center
	G.TextRenderingHint = Drawing.Text.TextRenderingHint.AntiAlias
	G.DrawString(txt & txt, New Font("Verdana", 12, FontStyle.Regular), _
			Brushes.DarkBlue, clipRect, format)
	PictureBox1.Invalidate()
End SubCode language: PHP (php)
The difference between the two subroutines is that the second sets an ellipse as the clipping area; anything we draw on it is automatically clipped.
The Clipped Image button sets up a similar clipping area and then draws an image centered behind the clipping ellipse. As you can see in Figure 14.15, only the segment of the image that’s inside the clipping area is visible. The code behind the Clipped Image button is shown in Listing 14.15.
Listing 14.15: The Clipped Image Button
Private Sub bttnClippedImage_Click(ByVal sender As System.Object, _
		ByVal e As System.EventArgs) Handles bttnClippedImage.Click
	OpenFileDialog1.Filter = "Images|*.gif;*.jpg;*.tif;*.tiff"
	OpenFileDialog1.InitialDirectory = My.Computer.FileSystem.SpecialDirectories.MyPictures & "\Sample Pictures"
	If OpenFileDialog1.ShowDialog = Windows.Forms.DialogResult.OK Then
		Dim G As Graphics
		G = GetGraphicsObject()
		G.ResetClip()
		Dim P As New System.Drawing.Drawing2D.GraphicsPath()
		Dim clipRect As New RectangleF(10, 10, PictureBox1.Width - 20, PictureBox1.Height - 20)
		P.AddEllipse(clipRect)
		G.SetClip(P)
		G.DrawImage(Image.FromFile(OpenFileDialog1.FileName), 10, 10)
		PictureBox1.Invalidate()
	End If
End SubCode language: PHP (php)
An easy and interesting technique for creating paths is to use the AddString method of the GraphicsPath object. Then you can draw an image over this path. The net effect is seeing sections of the image through the string’s characters. You can open the StringPath sample project to see how you can clip an image with text; just be sure you select an interesting image to show through the string’s characters.


