Menus are among the most common and most characteristic elements of the Windows user interface. Even in the old days of character-based displays, menus were used to display methodically organized choices and guide the user through an application. Despite the visually rich interfaces of Windows applications and the many alternatives, menus are still the most popular means of organizing a large number of options. Many applications duplicate some or all of their menus in the form of toolbar icons, but the menu is a standard fixture of a form. You can turn the toolbars on and off, but not the menus.
The Menu Editor
Menus can be attached only to forms, and they’re implemented through the MenuStrip control. The items that make up the menu are ToolStripMenuItem objects. As you will see, the MenuStrip control and ToolStripMenuItem objects give you absolute control over the structure and appearance of the menus of your application. The MenuStrip control is a variation of the Strip control, which is the base of menus, toolbars, and status bars.
You can design menus visually and then program their Click event handlers. In principle, that’s all there is to a menu: You specify its items (the menu’s commands) and then you program each command’s actions. Depending on the needs of your application, you might want to enable and disable certain commands, add context menus to some of the controls on your form, and so on. Because each item in a menu is represented by a ToolStripMenuItem object, you can control the application’s menus from within your code by manipulating the properties of the ToolStripMenuItem objects. Let’s start by designing a simple menu, and I’ll show you how to manipulate the menu objects from within your code as we go along.
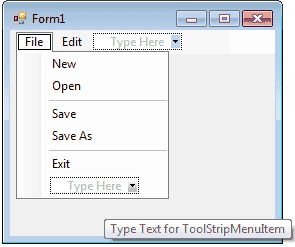
Double-click the MenuStrip icon in the Toolbox. (You’ll find the MenuStrip control in the Menus & Toolbars tab of the Toolbox.) An instance of the MenuStrip control will be added to the form, and a single menu command will appear on your form. Its caption will be Type Here. If you don’t see the first menu item on the form right away, select the MenuStrip control in the Components tray below the form. Do as the caption says: Click it and enter the first command’s caption, File, as seen in Figure 5.15. To add items under the File menu, press Enter. To enter another command in the main menu, press Tab. Depending on your action, another box will be added, in which you can type the caption of the next command. Press Enter to move to the next item vertically, and Tab to move to the next item horizontally. To insert a separator, enter a hyphen (-) as the item’s caption.

Figure 5.15 – Designing a Menu on a Form
When you hover the pointer over a menu item, a drop-down button appears to the right of the item. Click this button to select the type of item you’ll place on the menu. This item can be a MenuItem object, a separator, a ComboBox, or a TextBox. In this chapter, I’ll focus on menu items, which are by far the most common elements on a menu. The last two options, however, allow you to build elaborate menus, reminiscent of the Office menus.
Enter the items of the File menu — New, Open, Save, SaveAs, and Exit — and then click somewhere on the form. All the temporary items (the ones with the Type Here caption) will disappear, and the menu will be finalized on the form.
To add the Edit menu, select the MenuStrip icon to activate the visual menu editor and then click the File item. In the new item that appears next to the File item on the control, enter the string Edit. Press Enter and you’ll switch to the first item of the Edit menu. Fill the Edit menu with the usual editing commands. Table 5.4 shows the captions (property Text) and names (property Name) for each menu and each command. You can also insert a standard menu with the Insert Standard Items command of the MenuStrip object’s context menu.
Table 5.4 – The Captions and Names of the File and Edit Menus
| Caption | Name |
|---|---|
| File | FileMenu |
| New | NewMenu |
| Open | OpenMenu |
| Save | SaveMenu |
| SaveAs | SaveAsMenu |
| Exit | ExitMenu |
| Edit | EditMenu |
| Copy | CopyMenu |
| Cut | CutMenu |
| Paste | PasteMenu |
| Find | FindMenu |
The leftmost items in Table 5.4 are the names of the first-level menus (File and Edit); the captions that are indented in the table are the commands on these two menus. Each menu item has a name, which allows you to access its properties from within your code. The same name is also used in naming the Click event handler of the item. The default names of the menu items you add visually to the application’s menu are based on the item’s caption followed by the suffix ToolStripMenuItem (FileToolStripMenuItem, NewToolStripMenuItem, and so on). You’ll probably want to change the default names to something less redundant. To do so, change the Name property in the Properties window. To view the properties of a menu item, right-click it and select Properties from the context menu.
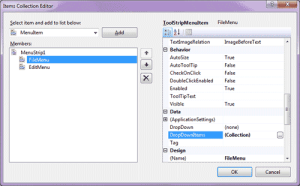
The most convenient method of editing a menu is to use the Items Collection Editor window, which is shown in Figure 5.16. This isn’t a visual editor, but you can set all the properties of each menu item without having to switch to the Properties window.

Figure 5.16 – Editing a menu with the Items Collection Editor
The Add button adds to the menu an item of the type specified in the combo box next to it (a menu item, combo box, or text box). To insert an item at a different location, add it to the menu and then use the arrow buttons to move it up or down. As you add new items, you can set their Text and Name properties on the right pane of the editor. You can also set their font, set the alignment and orientation of the text, and specify an image to be displayed along with the text. To add an image to a menu item, locate the Image property and click the ellipsis button. A dialog box will appear, in which you can select the appropriate resource. Notice that all the images you use on your form are stored as resources of the project. You can add all the images and icons you might need in a project to the same resource file and reuse them at will. The TextImageRelation property allows you to specify the relative positions of the text and the image. You can also select to display text only, images only, or text and images for each menu item with the DisplayStyle property.
If the menu item leads to a submenu, you must also specify the submenu’s items. Locate the DropDownItems property and click the ellipsis button. An identical window will appear, in which you can enter the drop-down items of the current menu item. Notice that the menu on the form is continuously updated while you edit it in the Items Collection Editor window, so you can see the effects of your changes on the form. Personally, I’m more productive with the editor than with the visual tools, mainly because all the properties are right there, and I don’t have to switch between the design surface and the Properties window.


