

In this section, we’ll develop a simple application to demonstrate not only the design of the interface, but also the code behind the interface. We’ll build an application that allows the user to enter the name of his favorite programming language, and the application will evaluate the choice. Objectively, VB is a step ahead of all other languages, and it will receive the best evaluation. All other languages get the same grade — good — but not VB.
Start a new project and use the name like HelloWorld (or any name you prefer) instead of the default name WindowsApplication1, and place a TextBox and a Button control on the form. Use the mouse to position and resize the controls on the form, as shown in Figure 1.8.

Figure 1.8 – A Simple VB 2008 Application
Start by setting the form’s Font property to Segoe UI, 9 pt. Arrange and size the controls as shown in Figure 1.8. Then place a Label control on the form and set its Text property to ‘What’s your Favorite Programming Language?”. The Label will be resized according to its caption, because the control’s AutoSize property is True. As you move the controls around on the form, you’ll see some blue lines connecting the edges of the controls when they’re aligned. These lines are called snap lines, and they allow you to align controls on the form.
Now you must insert some code to evaluate the user’s favorite language. Windows applications are made up of small code segments, called event handlers, which react to specific actions such as the click of a button, the selection of a menu command, the click of a check box, and so on. In the case of our example, we want to program the action of clicking the button. When the user clicks the button, we want to execute some code that will display a message.
To insert some code behind the Button control, double-click the control. You’ll see the code window of the application, which is shown in Figure 1.9. You will see only the definition of the procedure, not the code that is shown between the two statements in the figure. The line Private . . . is too long to fit on the printed page, so I inserted a line continuation character (an underscore) to break it into two lines. When a line is too long, you can break it into two (or more) lines by inserting this character. Alternatively, you can turn on the WordWrap feature of the editor (you’ll see shortly how to adjust the editor’s properties). Notice that I also inserted quite a bit of space before the second half of the first code line. It’s customary to indent continued lines so they can be easily distinguished from the other lines. If you enter the line continuation character in the editor, the following line will be indented automatically.
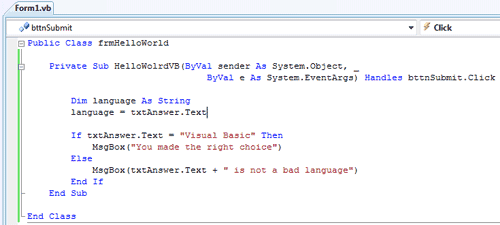
Figure 1.9 – Code inside the Click Event of a Button Control
The editor opens a subroutine, which is delimited by the following statements:
Private Sub Button1_Click(ByVal sender As System.Object, _
      ByVal e As System.EventArgs) Handles Button1.Click
End SubCode language: VB.NET (vbnet)
At the top of the main pane of the Designer, you will see two tabs named after the form: the Form1.vb [Design] tab and the Form1.vb tab. The first tab is the Windows Form Designer in which you build the interface of the application with visual tools, and the second is the code editor in which you insert the code behind the interface. At the top of the code editor, which is what you see in Figure 1.9, are two ComboBoxes. The one on the left contains the names of the controls on the form. The one on the right contains the names of events each control recognizes. When you select a control (or an object, in general) in the left list, the other list’s contents are adjusted accordingly. To program a specific event of a specific control, select the name of the control in the left list (the Objects list) and the name of the event in the right list (the Events list). While Button1 is selected in the Objects list, open the Events list to see the events to which the button can react.
The Click event happens to be the default event of the Button control, so when you double-click a Button on the form, you’re taken to the Button1 Click subroutine. This subroutine is an event handler, which is invoked automatically every time an event takes place. The event of interest in our example is the Click event of the Button1 control. Every time the Button1 control on the form is clicked, the Button1 Click subroutine is activated. To react to the Click event of the button, you must insert the appropriate code in this subroutine.
There are more than two dozen events for the Button control, and it is among the simpler controls (after all, what can you do to a button besides clicking it?). Most of the controls recognize a very large number of events.
The definition of the event handler can’t be modified; this is the event handler’s signature (the arguments it passes to the application). All event handlers in VB 2008 pass two arguments to the application: the sender argument, which is an object that represents the control that fired the event, and the e argument, which provides additional information about the event.
The name of the subroutine is made up of the name of the control, followed by an underscore and the name of the event. This is just the default name, and you can change it to anything you like (such as EvaluateLanguage, for this example, or StartCalculations). What makes this subroutine an event handler is the keyword Handles at the end of the statement. The Handles keyword tells the compiler which event this subroutine is supposed to handle. Button1.Click is the Click event of the Button1 control. If there were another button on the form, the Button2 control, you’d have to write code for a subroutine that would handle the Button2.Click event. Each control recognizes many events, and you can provide a different event handler for each control and event combination. Of course, we never program every possible event for every control.
The controls have a default behavior and handle the basic events on their own. The TextBox control knows how to handle keystrokes. The CheckBox control (a small square with a check mark) changes state by hiding or displaying the check mark every time it’s clicked. The ScrollBar control moves its indicator (the button in the middle of the control) every time you click one of the arrows at the two ends. Because of this default behavior of the controls, you need not supply any code for the events of most controls on the form.
If you change the name of the control after you have inserted some code in an event handler, the name of the event handled by the subroutine will be automatically changed. The name of the subroutine, however, won’t change. If you change the name of the Button1 control to bttnSubmit, the subroutine’s header will become
Private Sub Button1_Click(ByVal sender As System.Object, _
    ByVal e As System.EventArgs) Handles bttnSubmit.Click

End SubCode language: VB.NET (vbnet)
Rename the Button1 Click subroutine to HelloWorldVB. You must edit the code to change the name of the event handler. I try to name the controls before adding any code to the application, so that their event handlers will be named correctly. Alternatively, you can use your own name for each event handler. The default names of the controls you place on a form are quite generic, and you should change them to something more meaningful. I usually prefix the control names with a few characters that indicate the control’s type (such as txt, lbl, bttn, and so on), followed by a meaningful name. Names such as txtLanguage and bttnEvaluate make your code far more readable. It’s a good practice to change the default names of the controls as soon as you add the controls to the form. Names such as Button1, Button2, Button3, and so on, don’t promote the readability of your code. With the exception of this first sample project, I’m using more-meaningful names for the controls used in this tutorial’s exercises.
Let’s add some code to the Click event handler of the Button1 control. When this button is clicked, we want to examine the text in the text box. If it’s Visual Basic, we display a message; if not, we display a different message. Insert the lines of Listing 1.1 between the Private Sub and End Sub statements. (I’m showing the entire listing here; there’s no reason to retype the first and last statements.)
Listing 1.1 Processing a User-Supplied String
Public Class frmHelloWorld
	Private Sub HelloWolrdVB(ByVal sender As System.Object, _
			ByVal e As System.EventArgs) Handles bttnSubmit.Click

		Dim language As String
		language = txtAnswer.Text

		If language = "Visual Basic" Then
			MsgBox("You made the right choice")
		Else
			MsgBox(language + " is not a bad language")
		End If

	End Sub
End ClassCode language: VB.NET (vbnet)
Here’s what this code does. First, it assigns the text of the TextBox control to the variable language. A variable is a named location in memory where a value is stored. Variables are where we store the intermediate results of our calculations when we write code. All variables are declared with a Dim statement and have a name and a type.
You could also declare and assign a value to the language variable in a single step:
Dim language = txtAnswer.TextCode language: VB.NET (vbnet)The compiler will create a String variable, because the statement assigns a string to the variable. We’ll come back to the topic of declaring and initializing variables in Chapter, ‘‘Variables and Data Types.’’
Then the program compares the value of the language variable to the literal Visual Basic, and depending on the outcome of the comparison, it displays one of two messages. The MsgBox() function displays the specified message in a small window with the OK button, as shown in Figure 1.8. Users can view the message and then click the OK button to close the message box. Even if you’re not familiar with the syntax of the language, you should be able to understand what this code does. Visual Basic is the simplest of the languages supported by Visual Studio 2008, and we will discuss the various aspects of the language in detail in the following chapters. In the meantime, you should try to understand the process of developing a Windows application: how to build the visible interface of the application and how to program the events to which you want your application to react.
The code of our first application isn’t very robust. If the user doesn’t enter the string with the exact spelling shown in the listing, the comparison will fail. We can convert the string to uppercase and then compare it with VISUAL BASIC to eliminate differences in case. To convert a string to uppercase, use the ToUpper method of the String class. The following expression returns the string stored in the language variable, converted to uppercase:
language.ToUpperCode language: VB.NET (vbnet)We should also take into consideration the fact that the user may enter VB or VB 2008, and so on. In the following section, we’ll further improve our application. You never know what users may throw at your application, so whenever possible you should try to limit their responses to the number of available choices. In our case, we can display the names of certain languages (the ones we’re interested in) and force the user to select one of them.
One way to display a limited number of choices is to use a ComboBox control. In the next page, we’ll revise our example application so that users won’t have to enter the name of the language. We’ll force them to select their favorite language from a list so that we won’t have to validate the string supplied by the user.

