

The ALTER DATABASE statement changes the physical structure of a database. The Transact-SQL language allows you to change the following properties of a database:
- Add or remove one or more database files
- Add or remove one or more log files
- Add or remove filegroups
- Modify file or filegroup properties
- Set database options
- Change the name of the database using the sp_rename stored procedure (discussed a bit later, in the section, “Altering a Table”)
The following subsections describe these different types of database alterations. In this section, we will also use the ALTER DATABASE statement to show how FILESTREAM data can be stored in files and filegroups and to explain the notion of contained databases.
Adding or Removing Database Files, Log Files, or Filegroups
The ALTER DATABASE statement allows the addition and removal of database files. The clauses ADD FILE and REMOVE FILE specify the addition of a new file and the deletion of an existing file, respectively. (Additionally, a new file can be assigned to an existing filegroup using the TO FILEGROUP option.)
Example 5.17 shows how a new database file can be added to the projects database.
USE master;
GO
ALTER DATABASE projects
ADD FILE (NAME=projects_dat1,
	FILENAME = 'C:\projects1.mdf', SIZE = 10,
	MAXSIZE = 100, FILEGROWTH = 5);Code language: PHP (php)
The ALTER DATABASE statement in Example 5.17 adds a new file with the logical name projects_dat1. Its initial size is 10MB, and this file will grow using units of 5MB until it reaches the upper limit of 100MB. (Log files are added in the same way as database files. The only difference is that you use the ADD LOG FILE clause instead of ADD FILE.)
The REMOVE FILE clause removes one or more files that belong to an existing database. The file can be a data file or a log file. The file cannot be removed unless it is empty.
The CREATE FILEGROUP clause creates a new filegroup, while DELETE FILEGROUP removes an existing filegroup from the system. Again, you cannot remove a filegroup unless it is empty.
Modifying File or Filegroup Properties
You can use the MODIFY FILE clause to change the following file properties:
- Change the logical name of a file using the NEWNAME option of the MODIFY FILE clause
- Increase the value of the SIZE property
- Change the FILENAME, MAXSIZE, or FILEGROWTH property
- Mark the file as OFFLINE
Similarly, you can use the MODIFY FILEGROUP clause to change the following filegroup properties:
- Change the name of a filegroup using the NAME option of the MODIFY FILEGROUP clause
- Mark the filegroup as the default filegroup using the DEFAULT option
- Mark the filegroup as read-only or read-write using the READ_ONLY or READ_WRITE option, respectively
Setting Database Options
The SET clause of the ALTER DATABASE statement is used to set different database options. Some options must be set to ON or OFF, but most of them have a list of possible values. Each database option has a default value, which is set in the model database. Therefore, you can alter the model database to change the default values of specific options.
All options that you can set are divided into several groups. The most important groups are
- State options
- Auto options
- SQL options
The state options control the following:
- User access to the database (options are SINGLE_USER, RESTRICTED_USER, and MULTI_USER)
- The status of the database (options are ONLINE, OFFLINE, and EMERGENCY)
- The read/write modus (options are READ_ONLY and READ_WRITE)
The auto options control, among other things, the art of the database shutdown (the option AUTO_CLOSE) and how index statistics are built (the options AUTO_CREATE_STATISTICS and AUTO_UPDATE_STATISTICS).
The SQL options control the ANSI compliance of the database and its objects. All SQL options can be edited using the DATABASEPROPERTYEX function and modified using the ALTER DATABASE statement. The recovery options FULL, BULK-LOGGED, and SIMPLE influence the art of database recovery.
Storing FILESTREAM Data
The previous chapter “SQL Components” explained what FILESTREAM data is and the reason for using it. This section discusses how FILESTREAM data can be stored as a part of a database. Before you can store FILESTREAM data, you have to enable the system for this task. The following subsection explains how to enable the operating system and the instance of your database system.
Enabling FILESTREAM Storage
FILESTREAM storage has to be enabled at two levels:
- For the Windows operating system
- For the particular server instance
You use SQL Server Configuration Manager to enable FILESTREAM storage at the OS level. Choose Start ➜ All Programs ➜ SQL Server 2012 ➜ Configuration Tools ➜ SQL Server Configuration Manager. In the list of services, right-click SQL Server Services and click Open. After that, right-click the instance on which you want to enable the FILESTREAM storage and click Properties. In the SQL Server Properties dialog box, click the FILESTREAM tab (see Figure 5-1). If you want just to read FILESTREAM data, check the Enable FILESTREAM for Transact-SQL Access check box. If you want to be able to read as well as write data, also check the Enable FILESTREAM for File I/O Streaming Access check box. Enter the name of the Windows share in the Windows Share Name box. (The Windows share is used for reading and writing FILESTREAM data using Win32 API. If you use a name to return the path of a FILESTREAM BLOB, it will use the name of the Windows share to display the path.)
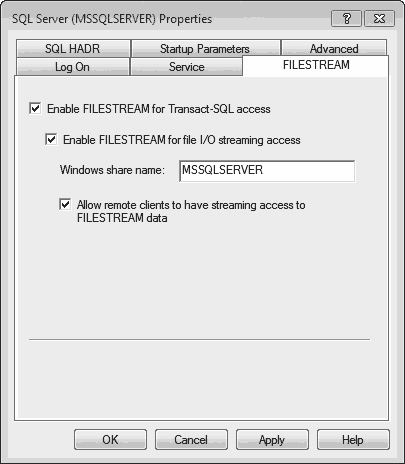
SQL Server Configuration Manager creates a new share with the specified name on the host system. Click OK to apply the changes.
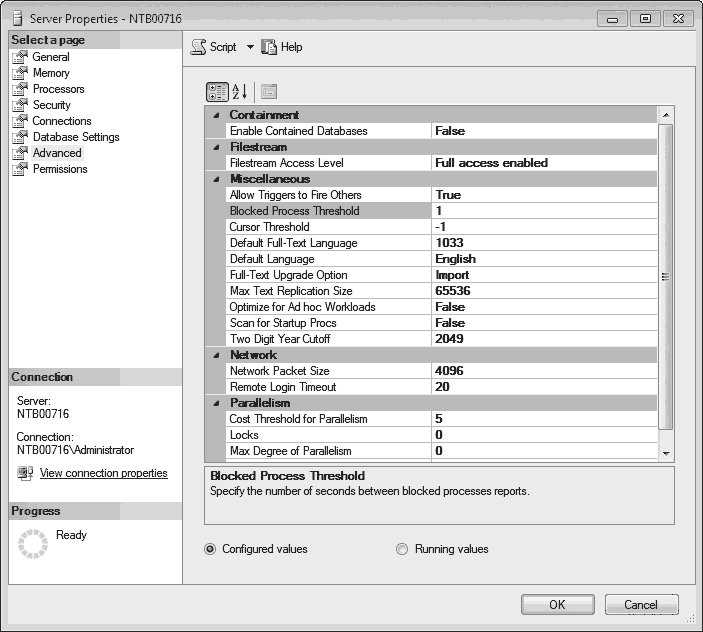
The next step is to enable FILESTREAM storage for a particular instance. SQL Server Management Studio will be used to show this task. (You can also use the sp_configure system procedure with the filestream access level option.) Right-click the instance in Object Explorer, click Properties, select Advanced in the left pane (see Figure 5-2), and set Filestream Access Level to one of the following levels:
- Disabled FILESTREAM storage is not allowed.
- Transact-SQL Access Enabled FILESTREAM data can be accessed using T-SQL statements.
- Full Access Enabled FILESTREAM data can be accessed using T-SQL as well as Win32.
Adding a File to the Filegroup
After you enable FILESTREAM storage for your instance, you can use the ALTER DATABASE statement first to create a filegroup for FILESTREAM data and then to add a file to that filegroup, as shown in Example 5.18. (Of course, you can also use the CREATE DATABASE statement to accomplish this task.)
USE sample;
ALTER DATABASE sample
	ADD FILEGROUP Employee_FSGroup CONTAINS FILESTREAM;

GO
ALTER DATABASE sample
	ADD FILE (NAME= employee_FS,
	FILENAME = 'C:\DUSAN\emp_FS')
	TO FILEGROUP Employee_FSGroupCode language: PHP (php)
The first ALTER DATABASE statement in Example 5.18 adds a new filegroup called Employee_FSGroup to the sample database. The CONTAINS FILESTREAM option tells the system that this filegroup will contain only FILESTREAM data. The second ALTER DATABASE statement adds a new file to the existing filegroup.
Now you can create a table with one or more FILESTREAM columns. Example 5.19 shows the creation of a table with a FILESTREAM column.
CREATE TABLE employee_info
	(id UNIQUEIDENTIFIER ROWGUIDCOL NOT NULL UNIQUE,
	filestream_data VARBINARY(MAX) FILESTREAM NULL)Code language: PHP (php)
The employee_info table in Example 5.19 contains the filestream_data columns, which must be of the VARBINARY(max) data type. Such a column includes the FILESTREAM attribute, indicating that a column should store data in the FILESTREAM filegroup. All tables that store FILESTREAM data require the existence of a UNIQUE ROWGUILDCOL. For this reason, the employee_info table has the id column, defined using these two attributes.
To insert data into a FILESTREAM column, you use the standard INSERT statement, which is described in Chapter “Modification of a Table’s Contents”. Also, to read data from a FILESTREAM column, you can use the standard SELECT statement, which is described in the next chapter “Queries”. The detailed description of read and write operations on FILESTREAM data are outside the scope of this tutorial.
Contained Databases
One of the significant problems with SQL Server databases is that they cannot be exported (or imported) easily. As you already know from this chapter, you can attach and detach a database, but many important parts and properties of the attached database will be missing. (The main problem in such a case is database security in general and existing logins in particular, which are usually incomplete or wrong after the move.)
Microsoft intends to solve such problems by introducing contained databases. A contained database comprises all database settings and data required to specify the database and is isolated from the instance of the Database Engine on which it is installed. In other words, this form of databases has no configuration dependencies on the instance and can easily be moved from one instance of SQL Server to another.
Generally, there are three forms of databases in relation to containment:
- Fully contained databases
- Partially contained databases
- Noncontained databases
Fully contained databases are those where database objects cannot cross the application boundary. (An application boundary defines the scope of an application. For instance, user-defined functions are within the application boundary, while functions related to server instances are outside it.)
Partially contained databases allow database objects to cross the application boundary, while noncontained databases do not support the notion of an application boundary at all.
Let’s take a look at how you can create a partially contained database in SQL Server 2012. If a database called my_sample already exists, and it is created as a noncontained database (using the CREATE DATABASE statement, for instance), you can use the ALTER DATABASE statement to alter it to partial containment, as shown in Example 5.20.
EXEC sp_configure 'show advanced options' , 1;
RECONFIGURE WITH OVERRIDE;
EXEC sp_configure 'contained database authentication' , 1;
RECONFIGURE WITH OVERRIDE;
ALTER DATABASE my_sample SET CONTAINMENT = PARTIAL;
EXEC sp_configure 'show advanced options' , 0;
RECONFIGURE WITH OVERRIDE;Code language: JavaScript (javascript)
The ALTER DATABASE statement modifies the containment of the my_sample database from noncontained to partially contained. This means that the database system allows you to create both contained and noncontained database objects for the my_sample database. (All other statements in Example 5.20 just set the scene for the ALTER DATABASE statement.)
For the my_sample database, you can now create a user that is not tied to a login. This will be described in detail in the “Managing Authorization and Authentication of Contained Databases” section of Chapter “Security System of the Database Engine”.