You can easily edit the XML file. Apart from changing the values of existing elements, such as a book’s price or page count, you can insert new elements.
Let’s add a new author to the second book. Create a new line before the closing tag </Authors> of the second book, and insert the following tag: Author. As soon as you type the closing bracket, the editor inserts the matching closing tag, and leaves the pointer between the two tags, so you can enter the value of the newly inserted element. The Author element is not a simple element; it contains two nested elements, FirstName and LastName. Enter the tag FirstName, and the editor inserts the matching closing tag. Type the author’s first name between the two tags. Then move after the closing tag and press Enter. In the new line, enter another author.
If you experiment a little with the XML Editor, you’ll realize that this isn’t a straight text editor. It reacts to your actions and makes sure that the XML document is constantly a valid document. If you deserialize the edited file, you’ll see that the AllBooks array will be populated with the data of the edited XML file: One of the books will have an additional author. It’s fairly straightforward to edit existing XML files or to create new ones with the XML Editor that comes with Visual Studio. The XML Editor makes sure that the file you’re editing follows the rules of a valid XML file — that is, the file’s tags open and close within the element they belong to, and there are no spaces or invalid characters in the tag names. If you make a mistake, the editor will instantly underline the offending element. If you hover the pointer over the element in error, you’ll see a description of the error.
The XML Editor can do more than help you generate valid XML files. With the Serialized XMLArray.xml file open in the editor, choose the Create Schema command from the XML menu. A new file is generated, the SerializedXMLArray.xsd file. XSD stands for XML Schema Definition, and the XSD files describe the schema (structure) of a class of XML files. The schema of the XML file with the books is another XML document, made up of nested tags. These tags, however, describe the names and structure of the elements that may appear in the document and their type. The following statements specify the data types of three elements:
<xs:element name="Title" type="xs:string" />
<xs:element name="Pages" type="xs:unsignedShort" />
<xs:element name="Price" type="xs:decimal" />Code language: HTML, XML (xml)
Authors is a complex element that may contain one or more Author elements, and each Author tag has two attributes: the FirstName and LastName attributes.
<xs:element name="Authors">
	<xs:complexType>
		<xs:sequence>
			<xs:element maxOccurs="unbounded" name="Author">
				<xs:complexType>
					<xs:attribute name="FirstName"
						type="xs:string" use="required" />
					<xs:attribute name="LastName"
						type="xs:string" use="required" />
				</xs:complexType>
			</xs:element>
		</xs:sequence>
	</xs:complexType>
</xs:element>Code language: HTML, XML (xml)
It’s fairly easy to understand the structure of both XML and XSD files, but it’s not nearly as easy to create an XSD file from scratch. The XML Editor, however, can apply a schema file to an XML document and make sure that the file you’re generating conforms to its schema. And this is how schemas are used: The editor reads the schema and makes sure that the XML document you’re reading complies with the specified schema.
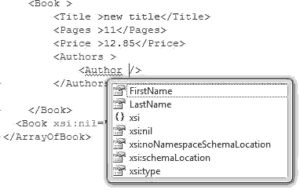
Enter a new <Book> tag in the file and you will see in IntelliSense the valid tags that may appear within this element every time you type the opening bracket. If you enter the tag, which must appear under an tag, you will see in the IntelliSense box the two attributes that may appear in the tag: the LastName and FirstName attributes (see Figure 12.5).

If you omit the Authors element, the editor will underline the closing </Book> tag. This indicates that the <Book> element may be invalid. Hover the pointer over the tag in error and you’ll see the error description in a ToolTip box. The error message indicates that the cause of the problem could be a missing <Authors> tag. If you examine the schema of the XML file, you’ll see that some of the elements contain a MinOccurs and a MaxOccurs attribute. The tag doesn’t contain any of these attributes, and the editor thinks that each Book element should contain at least one Authors subelement. This happened because the schema was generated from a sample XML document in which all books had at least one author. Edit the XSD file by inserting the MinOccurs attribute in the definition of the Authors element:
<xs:element name="Authors" minOccurs="0">Code language: HTML, XML (xml)The warning will go away, because the revised schema allows books to have no authors.
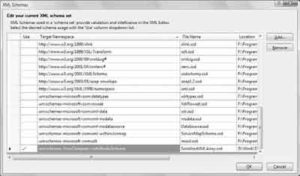
The newly generated schema is applied to the open document immediately. You can specify which schema is applied to the document you’re editing with the Schemas property of the document. Click the ellipses button in the Schemas property to see the XML Schemas dialog box, which contains a number of schemata. Click the Add button to open the File Open dialog box and locate the desired schema in your hard drive. To apply a specific schema to the current document, select the Use option in the first column of the XML Schemas dialog box, as shown in Figure 12.6.

Initially, the Target Namespace column for the schema created by Visual Studio will be empty. This column’s setting won’t affect your document in any way, but it does help you select the proper schema when you need it. To specify a value for the target namespace, insert a targetNamespace attribute in the <xsd:schema> tag at the beginning of the file:
targetNamespace="urn:schemas-YourCompany-com:BooksSchema"Code language: JavaScript (javascript)You may be thinking, “Why bother with editing XML files?” The reason for this short introduction to XML will become obvious in the following chapter, where you’ll learn how to create XML documents programmatically and how to process XML files in your application.


