In the previous section, you learned how to compile and run a Java program from the command line, which is helpful for troubleshooting. However, for routine work, it’s more efficient to utilize an integrated development environment (IDE). Due to their power and convenience, working without an IDE is less practical. Top-notch free options include Eclipse, IntelliJ IDEA, and NetBeans. This section will guide you through getting started with Eclipse, but feel free to use a different IDE of your choice while following this tutorial.
To write a program with Eclipse, follow these detailed steps:
Install Eclipse: Download and install Eclipse IDE for Java Developers from the official website: https://www.eclipse.org/downloads/. Run the installer and select “Eclipse IDE for Java Developers” when prompted. Follow the installation instructions to complete the setup. You may need to select a workspace directory where your projects will be stored.
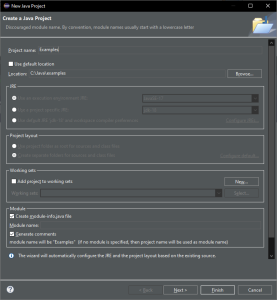
Create a new Java project: Open Eclipse and create a new Java project by clicking on File > New > Java Project. Give your project a name, such as MyFirstEclipseProject, and click on Next. Configure your project settings, such as the Java version to use, and click on Finish.

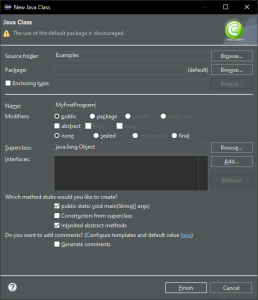
Create a new Java class: Right-click on the project you just created, and then click on New > Class. Give your class a name (e.g., MyFirstProgram) and ensure that the option public static void main(String[] args) is checked, so that Eclipse will automatically generate the main method for you. Click on Finish.

Write your Java code: Inside the newly created Java class, write your Java code in the provided editor. For example, you can create a simple “Hello, World!” program:
public class MyFirstProgram {
    public static void main(String[] args) {
        System.out.println("Hello, World!");
    }
}Code language: JavaScript (javascript)
You can also add more classes, methods, and variables as needed.
Save your code: Press Ctrl + S (or Cmd + S on macOS) to save your code. Eclipse automatically compiles your code when you save it.
Compile and run the program: Right-click on the Java class file in the Project Explorer, and then click on Run As > Java Application. The output of your program will be displayed in the Console view, located at the bottom of the Eclipse window.
Debugging: To debug your code, set breakpoints by double-clicking in the left margin of the editor window next to the lines of code where you want the debugger to pause. Then, right-click on the Java class file in the Project Explorer, and click on Debug As > Java Application. The Eclipse debugger will launch, and the program will pause at the breakpoints you set. You can step through your code using the debugging controls (e.g., Step Over, Step Into, Step Return), inspect variables, and identify any issues.
Managing your project: As your project grows, you may need to add external libraries, manage dependencies, or refactor your code. Eclipse offers built-in tools for these tasks, such as the Package Explorer, Outline view, and various refactoring options available under the Refactor menu.
Error messages in Eclipse
Eclipse IDE can help you identify and resolve errors in your Java code through its error reporting and debugging features. Here are some common error messages you may encounter in Eclipse, along with examples and tips for fixing them.
Syntax Errors
Syntax errors occur when your code doesn’t adhere to the proper syntax rules of the Java programming language.
Example:
public class SyntaxErrorExample {
    public static void main(String[] args) {
        System.out.println("Hello, World!");
// Missing closing braceCode language: JavaScript (javascript)Fix: Make sure your code follows Java syntax rules, such as properly closing parentheses, braces, and quotes. In this example, you need to add a closing brace } at the end of the class.
Type Mismatch
Type mismatches occur when you try to assign a value of one data type to a variable of a different data type.
Example:
public class TypeMismatchExample {
    public static void main(String[] args) {
        int number = "Hello, World!";
    }
}Code language: JavaScript (javascript)Fix: Ensure that you assign values of the correct data type to your variables. In this example, you need to assign an integer value to the number variable, not a string.
Undefined Method
Undefined method errors occur when you try to call a method that doesn’t exist or isn’t accessible from the current class.
Example:
public class UndefinedMethodExample {
    public static void main(String[] args) {
        myUndefinedMethod();
    }
}Code language: JavaScript (javascript)Fix: Make sure the method you’re calling exists and is accessible from the current class. In this example, you need to define the myUndefinedMethod() method inside the class.
Unresolved Import
Unresolved import errors occur when you try to import a class or package that cannot be found.
Example:
import com.example.nonexistentpackage.NonExistentClass;

public class UnresolvedImportExample {
    public static void main(String[] args) {
        NonExistentClass obj = new NonExistentClass();
    }
}Code language: JavaScript (javascript)Fix: Ensure that you’re importing the correct class or package and that it’s available on your build path. In this example, you need to import a valid class or package instead of the non-existent one.
Null Pointer Exception
Null pointer exceptions occur when you try to call a method or access a field on a null object.
Example:
public class NullPointerExceptionExample {
    public static void main(String[] args) {
        String text = null;
        int length = text.length();
    }
}Code language: JavaScript (javascript)Fix: Make sure you initialize your objects before using them. In this example, you need to assign a non-null value to the text variable before calling the length() method.
By understanding these common error messages and their solutions, you’ll be better equipped to resolve issues in your Java code within the Eclipse IDE.

