The Java Development Kit (JDK) is an essential tool for Java developers, providing the necessary components to compile, debug, and run Java applications. In this section, we’ll walk you through the process of installing the JDK on your machine step by step, ensuring your Java programming experience gets off to the perfect start.
Prerequisites
Before installing the JDK, ensure you meet the following prerequisites:
- A compatible operating system (Windows, macOS, or Linux)
- Administrator access to install software on your computer
- A stable internet connection for downloading the JDK
Step 1 – Download the JDK
To begin, visit the official Oracle website to download the JDK:
- Go to the Oracle JDK download page: https://www.oracle.com/java/technologies/downloads/
- Select the appropriate version for your operating system (Windows, macOS, or Linux)
- Click on the download link and accept the license agreement
Step 2 – Install the JDK
Follow the instructions below based on your operating system:
Windows
Locate the downloaded JDK installer file (typically in your “Downloads” folder) and double-click it to start the installation process.
- Click “Next” on the welcome screen.
- Choose the installation directory for the JDK (default is recommended) and click “Next.”
- Optionally, you can change the installation directory for the Java Runtime Environment (JRE), but the default is recommended. Click “Next” to proceed.
- The installation will begin. Once it’s complete, click “Close” to exit the installer.
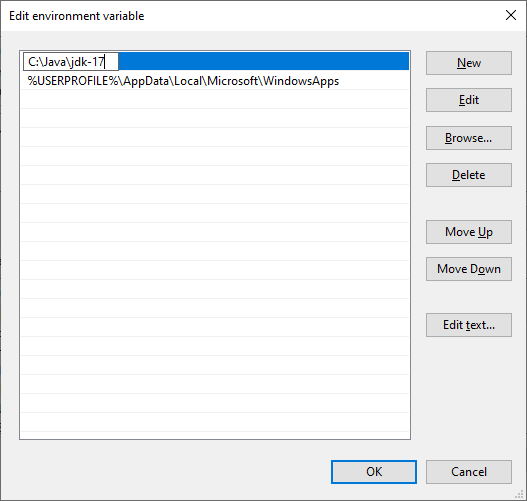
Upon installing the JDK on Windows, an extra step might be required: Include the jdk/bin directory in the executable path, which is a collection of directories the operating system searches through to find executable files.
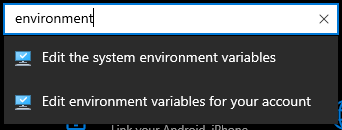
In Windows 10, enter “environment” into the search bar within Windows Settings, and choose “Edit environment variables for your account.” An Environment Variables dialog will show up.

In the User Variables list, find and select the Path variable. Press the Edit button, followed by the New button, and include an entry for the jdk\bin directory. Save your changes. From now on, any newly opened “Command Prompt” windows will have the proper path configured.

macOS
- Locate the downloaded JDK installer file (typically in your “Downloads” folder) and double-click it to open the installation package.
- Double-click the “JDK.pkg” file to start the installation process.
- Click “Continue” on the welcome screen.
- Read the software license agreement, click “Continue,” and then “Agree” to accept the terms.
- Choose the installation location (default is recommended) and click “Install.”
- Enter your administrator password when prompted and click “Install Software.”
- The installation will begin. Once it’s complete, click “Close” to exit the installer.
Linux
Open a terminal window and navigate to the directory where you downloaded the JDK installer.
Change the file permissions to make the installer executable by running:
chmod +x jdk-17_linux-x64_bin.tar.gzCode language: CSS (css)Extract the contents of the archive by running:
tar -xvf jdk-17_linux-x64_bin.tar.gzCode language: CSS (css)Move the extracted JDK folder to a suitable location, such as /usr/local/:
sudo mv jdk-17 /usr/local/Set up the JAVA_HOME environment variable by adding the following lines to your ~/.bashrc or ~/.bash_profile file:
export JAVA_HOME=/usr/local/jdk-17 export PATH=$JAVA_HOME/bin:$PATHCode language: JavaScript (javascript)Save the file and restart your terminal or run:
source ~/.bashrcor
source ~/.bash_profileVerify the JDK installation by running:
java -versionIf the installation was successful, you should see the version number and other information about the installed JDK.
Installing Source Files and Documentation for Java
The JDK comes with a compressed file, lib/src.zip, containing the library source files. To access the source code, follow these steps:
Ensure that the JDK is installed and the jdk/bin directory is included in the executable path.
Create a directory called “javasrc” in your home directory. You can use a terminal window to do this by running the command:
mkdir javasrcLocate the src.zip file within the jdk/lib directory.
Extract the contents of the src.zip file into the “javasrc” directory. Using a terminal window, execute the following commands:
cd javasrc
jar xvf /path/to/jdk/lib/src.zip
cd ..
Replace /path/to/jdk with the actual path to your JDK installation.
The src.zip file includes the source code for all public libraries. For additional source code – covering the compiler, virtual machine, native methods, and private helper classes – visit the OpenJDK website at http://openjdk.java.net.
The Java documentation is provided as a separate compressed file from the JDK. To download and access the documentation, follow these steps:
Visit https://www.oracle.com/java/technologies/downloads/ to download the documentation.
Locate the “jdk-17.0.x_doc-all.zip” file and download it.
Extract the zip file and rename the “doc” directory to something more descriptive, such as “javadoc.” You can use the command line to perform these actions:
jar xvf Downloads/jdk-17.0.x_doc-all.zip
mv docs jdk-17-docs
Open your web browser and navigate to the “jdk-17-docs/index.html” file within the extracted directory. Bookmark this page for easy access to the Java documentation in the future.

